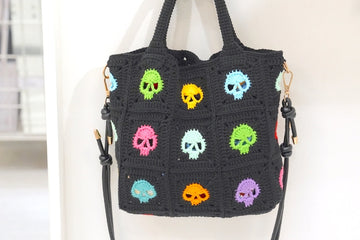
Ready to add a spooky twist to your crochet projects? Look no further than this skull granny square bag!
Perfect for Halloween or year-round edgy style, this eye-catching accessory combines classic granny square technique with a bold skull motif. Whether you're a seasoned crocheter or just starting out, this free pattern will guide you through creating your very own unique handbag. Stick around for detailed, step-by-step instructions and helpful diagrams that'll make crafting this bag a breeze. Let's dive in and bring this wickedly cool design to life!
Pin for Later
Don't let this hauntingly cool bag slip away - pin it now and crochet later!

Details About Skull Granny Square Bag
Each of our spooky skull squares measures a perfect 3 inches, ideal for showcasing those hauntingly cool designs. To bring this eerie accessory to life, you'll be conjuring up and joining 27 of these wickedly charming squares - it's like assembling your very own miniature graveyard!
Once complete, your bag will measure approximately 11.2 inches wide and 9.8 inches tall, not including the strap. It's just the right size for carrying your daily essentials or your favorite Halloween treats.
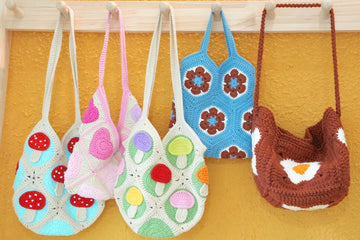
As for the colors, I'm captivated by the classic black and white combo - it really makes those skull designs pop with an otherworldly charm. But don't let that limit your creativity! You could go for a spooky Halloween palette with orange and purple, or embrace your inner rock star with bold neons. How about a gradient effect from light gray to black for a misty graveyard feel? The possibilities are as endless as a moonless night!
Remember, this is your unique creation. Choose colors that give you goosebumps (in a good way!) and reflect your personal style. After all, the best part of crocheting is weaving a bit of your own magic into every stitch!
Recommended Yarn and Crochet Hooks
Hey there, crochet enthusiasts! Let's dive into the essentials for our spooky skull granny square bag: yarn and hooks!
For this project, I'm totally in love with Loopara 5 ply milk cotton yarn. It's not just fun to say - it's a joy to work with! This yarn is a granny square superstar because it's soft yet durable, maintains its shape beautifully, and comes in a wide range of colors to make your skull designs truly pop. Plus, it's got a subtle sheen that'll give your bag a touch of eerie elegance.
Color-wise, we're aiming for that perfect balance of spooky and stylish. I'd recommend snagging a ball of crisp white for those grinning skulls and a deep, mysterious black for the background. Feeling adventurous? Throw in a vibrant purple or a glowing orange for some extra Halloween pizzazz!
Now, here's the important bit: we're using a 3.0mm hook for this project. This size is the perfect partner for our 5 ply yarn, creating tight, neat stitches that'll keep your skulls looking sharp and your bag sturdy. It's like a magic wand for crafting crisp, well-defined granny squares!
Remember, one of the coolest things about granny squares is their stash-busting power. So don't be shy about digging into your yarn collection and playing with different color combos. Each square is like a tiny canvas for your creativity. Now, let's get hooking and bring those skulls to life!
Materials needed for Skull Granny Square Bag
- Yarn – Loopara 5ply combed cotton
- Hook – 3.0mm
- Stitch Marker
- Scissors
- Strap
- D-ring

Abbreviations (US Terms)
- ch - chain
- dc - double crochet
- sc - single crochet
- sl - slip stitch
- hdc - half double crochet
- Magic ring
Skull Granny Square Bag Layout

Let's take a peek at our Skull Granny Square Bag layout! This diagram shows you how to arrange your spooky squares to form the bag. It's your roadmap to assembling all those skull-tastic pieces into a functional, eye-catching accessory. Think of it as the blueprint for your creepy-cool creation!
How to Crochet Skull Granny Square Bag – Step by Step
How to Crochet a Skull Granny Square (Make 27)
Note: The tutorial uses different yarn colors for the crocheting and assembly processes. You can choose whatever color you like. If you’re not crazy about our color palette, I put together two color-changing techniques that I use for all of my projects. Let me show you how to make these color transitions smooth and professional so you can bring your unique, creative vision to life.

Round 1: Start with a magic ring. Chain 2 (counts as first double crochet). Work 9 double crochet into the ring. Chain 5, double crochet, chain 3, double crochet, chain 5. Tighten the magic ring, then slip stitch to join.

Round 2: Chain 1 (doesn't count as a stitch). Work 9 single crochet. Work 6 more single crochet. For the corner: slip stitch, chain 2, 2 double crochet, chain 2, slip stitch. Work 6 more single crochet. Slip stitch to join. Fasten off and weave in ends.

Round 3: Join new color yarn. Work (double crochet, chain 3, 2 double crochet). [Work double crochet, 3 half double crochet, double crochet, (2 double crochet, chain 3, 2 double crochet)] twice. Work double crochet, 3 single crochet, double crochet. Work (2 double crochet, chain 3, 2 double crochet). Work double crochet, 3 half double crochet, double crochet, double crochet. Slip stitch to join.

Round 4: [Work 9 double crochet, (2 double crochet, chain 3, 2 double crochet)] 4 times. Fasten off and weave in ends.
Tips: When crocheting the Skull Granny Square, maintain tight tension in the first two rounds for a crisp skull shape. The magic ring start is crucial for a neat center, so practice if you're unfamiliar. Pay extra attention to stitch count in round 2 to form the skull's outline accurately. Consider using a slightly smaller hook for detail work. Leave longer tails when changing yarn to embroider eye sockets later if desired.
How to Crochet a Strap (Make 2)

Round 1: Start by leaving a long tail for sewing. Chain 9. Work in the 2nd chain from hook: (8 single crochets, chain 1, turn) repeat 8 times.

Round 2: Slip stitch, chain 1. (8 single crochets, slip stitch, chain 1) repeat 59 times.

Round 3: (8 single crochets, chain 1, turn) repeat 9 times. At the end of the strap, leave a long tail for sewing.
Crochet Skull Granny Square Bag Assemble
How to Assemble the Bag Body

Step 1: Follow the layout in [Figure 1] and start attaching the squares with stitch markers.

Step 2: Following the arrows in [Figure 1], use the slip stitch method to join the squares. Insert your hook through the center of the corner motif.

Step 3: Align the stitches carefully, with the wrong sides of the squares facing each other. Pick up half of each stitch on the inside edge for the slip stitch join. Keep the working yarn below your hook with your left hand.

Step 4: Match the stitches one-by-one as you continue joining.

Step 5: Use the slip stitch method to join the remaining two rows of squares.

Step 6: Once the horizontal rows are joined, secure with a slip stitch, fasten off, and weave in the ends.

Step 7: Sew the vertical rows of squares following the layout in [Figure 2], using the slip stitch method.

Step 8: Work a slip stitch at the junction where vertical squares meet to transition smoothly. Secure with a slip stitch, fasten off and weave in the ends.

Step 9: The flat assembly of the bag body is now complete.

Step 10: Turn the bag inside out. Fold the body in half and align the stitch markers. Align the stitch markers for the bag bottom.

Step 11: Follow the sewing lines in [Figures 3] and [4] to join the sides and bottom using the slip stitch method.

Step 12: Add edge detail: Work two rounds of single crochet around the bag opening.

Step 13: The bag body assembly is now complete.
How to Assemble the Strap and D-Ring

Strap: Sew the strap together, securing it with multiple stitches.

D-Ring Attachment: Sew the D-ring to the middle of the bag's side. Position it 1 cm below the bag's opening. Use multiple stitches to secure it firmly in place.
Tips: Align patterns when joining squares. Use invisible seams for a neat finish. Reinforce handles and bottom for durability. Add a zipper or button closure last. Pay attention to details for overall aesthetics. Block the finished bag to enhance shape and appearance.
More Skull Granny Square Patterns to Pick
If you want more skull granny square patterns, visit GrannySquare.Me.
How to Join Granny Squares
While I've used one simple joining method in this pattern, you might find another technique that better suits your style. I'm excited to share my comprehensive guide on 11 Ways to Join Granny Squares with you! I've detailed every method I know and love - each brings its own special touch to your finished piece. Let me help you discover which one works best for you!
How to Weave in Ends Crochet Granny Square
The secret for professional-looking granny squares is all about how you weave in those ends. I'm sharing 3 ways to weave in ends with you! These are techniques I've perfected over years of crocheting and use in all my projects. I'll show you exactly how I secure my ends to make sturdy, polished pieces that last. Trust me, once you master these finishing methods, your granny squares will look absolutely stunning!
Care and Cleaning Instructions
Daily Care Tips
Hey there, skull bag enthusiast! Let's keep your creepy-cool creation looking fresh. Give your bag a gentle shake after each use to remove any sneaky debris. If you spot a small stain, don't panic! Just dab it gently with a damp cloth. And remember, your bag loves adventures but isn't a fan of rough surfaces - treat it kindly!
Washing Methods
When your skull bag needs a spa day, here's the plan: Fill your sink with cool water and add a splash of mild detergent. Gently submerge your bag and give it a soft massage. Rinse thoroughly until the water runs clear - no soap residue allowed! Now, resist the urge to wring it out. Instead, roll it in a clean towel to remove excess water. Let it air dry flat, reshaping as needed. Your bag will thank you!
Storage Suggestions
Time to tuck your skull bag away? Let's do it right! First, make sure it's completely dry - moisture is not your friend here. Stuff it lightly with acid-free tissue paper to help maintain its shape (think of it as a little pillow for your bag's beauty sleep). Store it in a cool, dry place away from direct sunlight - UV rays can fade those awesome colors. If you have the original dust bag, use it! If not, a pillowcase works great too.

What’s Next?
Hey, crochet enthusiasts! Did this skull granny square bag steal your heart? Spread the spooky love! Share this pattern on Facebook, pin it on Pinterest, snap a pic for Instagram, or tweet about it to Twitter. Let's create a crochet craze and inspire others to join our crafty coven! #SkullGrannySquareBag