Are you ready to add a touch of handmade charm to your wardrobe? Let's crochet a delightful granny square bucket bag together!
This eye-catching accessory combines classic granny square motifs with a modern bucket bag silhouette, creating a unique and versatile piece you'll love to carry. With its colorful flower motifs and roomy design, this bag is perfect for everyday use or as a conversation starter at your next crafting meetup.
Ready to get hooking? I'll guide you through each step with clear instructions and helpful tips. Grab your yarn and let's create something beautiful!
Pin for later
Pin this pattern and let's start crocheting your new favorite bag!

Details About Granny Square Bucket Bag Pattern
Ready to dive into the details of our adorable granny square bucket bag? Let's get cozy and chat about what makes this project so special!
First up, we're working with 4-inch (10 cm) granny squares – the perfect size to show off those beautiful stitches without feeling overwhelming. You'll need six of these little beauties to bring your bag to life. Isn't it amazing how a handful of squares can transform into something so functional?
Once you've worked your magic, your finished bag will stand proud at 13 inches (33 cm) tall and 10.6 inches (27 cm) wide. It's roomy enough for all your essentials, yet compact enough to be your go-to everyday companion.
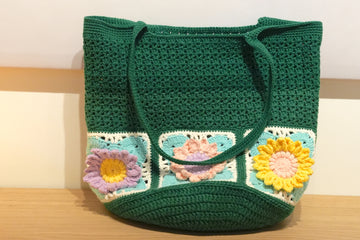
Now, let's talk colors! This is where you get to let your personality shine. I'm loving the combo in our example – that deep forest green base with pops of mint, yellow, and soft pink flowers. It's giving me major springtime vibes. But don't be afraid to play around. Maybe you're feeling bold reds and oranges, or perhaps a soothing palette of ocean blues? The sky's the limit!
Remember, this bag is all about you. So feel free to choose your favorite yarns, and let's create something that's uniquely yours.
Recommended Yarn and Crochet Hooks
Let's chat about the fun part - picking out your materials for this adorable granny square bucket bag.
For this project, I'm absolutely smitten with Loopara 5 ply milk cotton yarn. It's not just a pretty face - this yarn is a dream to work with! It's soft, durable, and comes in a rainbow of gorgeous colors. Plus, it gives your granny squares that crisp, defined look we're all after.
Now, let's talk colors. Our sample bag is rocking that stunning forest green base with pops of mint, yellow, and soft pink for the flowers. But hey, this is your show! Feel like channeling autumn vibes? Go for deep reds and oranges. Dreaming of the beach? Ocean blues and sandy neutrals could be your jam. The beauty of granny squares is how they showcase colors, so don't be shy!
As for hooks, we're using two sizes here: 3.0mm and 3.5mm. The 3.0mm is perfect for most of the bag, giving you nice, tight stitches. We'll switch to the 3.5mm for the bottom to give it a bit more structure.
One of the things I absolutely adore about granny squares is how portable they are. You can whip up a square while waiting for your coffee, on your lunch break, or binge-watching your favorite show. Before you know it, you'll have all six squares ready to go! Remember, the joy of crocheting is in the process as much as the result.
Materials needed for Granny Square Bucket Bag Pattern
- Yarn – Loopara 5ply combed cotton
- Hook – 3.0mm and 3.5mm
- Stitch Marker
- Scissors
- Yarn Needle

Abbreviations (US Terms)
- ch - chain
- sc - single crochet
- dc - double crochet
- sl - slip stitch
- hdc - half double crochet
- tr - treble crochet
- dc2tog - double crochet 2 together
- dc3tog - double crochet 3 together
- sc3tog - single crochet 3 together
- bobble st - bobble stitch
- picot - picot stitch
- inc - increase
- dec - decrease
Granny Square Bucket Bag Pattern Layout

This is our Granny Square Bucket Bag layout - your roadmap to crochet success! This diagram shows how our six lovely squares come together to form the bag's body. It's a visual guide to help you arrange and join your squares perfectly, ensuring your bag looks fabulous from every angle.
How to Crochet Granny Square Bucket Bag Pattern – Step by Step
Note: The tutorial uses different yarn colors for the crocheting and assembly processes. You can choose whatever color you like. If you’re not crazy about our color palette, I put together two color-changing techniques that I use for all of my projects. Let me show you how to make these color transitions smooth and professional so you can bring your unique, creative vision to life.
How to Crochet a Sunflower Granny Square (Make 6)

Round 1: Make a magic ring, chain 3, work 15 double crochet into the ring, slip stitch to join.

Round 2: Chain 2, work (2 double crochet bobble stitch), chain 1, (3 double crochet bobble stitch) 15 times, chain 1, slip stitch to join.

Round 3: Chain 1, work (single crochet, chain 4 picot, single crochet) 16 times, slip stitch to join.

Round 4: [Chain 1, work (single crochet, half double crochet, 2 double crochet, chain 2 picot, 2 double crochet, half double crochet, single crochet), chain 1, slip stitch] 16 times.

Round 5: Chain 5, [double crochet (working into one loop of bobble stitch from round 2), chain 2] 15 times, slip stitch to join.

Round 6: [Chain 1, single crochet increase, chain 2, single crochet, chain 2, (single crochet, chain 4 picot, single crochet), chain 2, single crochet, chain 2] 4 times, slip stitch to join.

Round 7: Chain 1, [2 single crochet, chain 2, single crochet (5 double crochet, chain 2, 5 double crochet), single crochet, chain 2] 4 times, slip stitch to join.

Round 8: [2 single crochet, chain 2, double crochet 2 together (1 double crochet in single crochet, skip 1, 1 double crochet in next stitch), 3 double crochet increase, (2 double crochet, chain 2, 2 double crochet), 3 double crochet increase, double crochet 3 together (skip 1, 1 double crochet in single crochet), chain 2] 4 times, slip stitch to join.

Round 9: Chain 5, [treble crochet, double crochet, chain 2 (skip 2), single crochet, chain 2 (skip 2), slip stitch, chain 2 (skip 2), (single crochet, chain, single crochet), chain 2 (skip 2), slip stitch, chain 2 (skip 2), single crochet, chain 2 (skip 2), double crochet, treble crochet, chain] 3 times, treble crochet, double crochet, chain 2 (skip 2), single crochet, chain 2 (skip 2), slip stitch, chain 2 (skip 2), (single crochet, chain, single crochet), chain 2 (skip 2), slip stitch, chain 2 (skip 2), single crochet, chain 2 (skip 2), double crochet, slip stitch to join.

Round 10: Chain 1, [13 single crochet, (3 single crochet in the corner), 10 single crochet] 4 times, slip stitch to join.

Round 11: Chain 1, [14 single crochet, (3 single crochet in the corner), 11 single crochet] 4 times, slip stitch to join.
Weave in all ends to finish.
Tips: When making bobble stitches in Round 2, keep them consistent in size for a uniform look. Block your squares after completing all rounds. This will help even out your stitches and make joining easier later.
How to Join Granny Squares

Step 1: Connect six granny squares into a ring following the flat diagram.

Step 2: Take two squares and place them back to back.

Step 3: Pick up the inner half of each stitch for a slip stitch join.
Step 4: Repeat the join at the starting point for reinforcement.

Step 5: Continue joining the corresponding stitches along the edges.
Step 6: Repeat the join at the end point for extra security.

Step 7: Weave in the ends on the wrong side, securing them multiple times.

Step 8: Use the same joining method for the remaining squares.

Step 9: Begin forming the bag into a ring shape.

Step 10: Before starting the final join, weave in the loose ends.

Step 11: Use the same slip stitch join method, picking up inner half stitches.
Tips: Use stitch markers to align the corners and midpoints of your squares before joining. This helps keep everything even as you work. After joining, gently stretch and reshape your work to help the seams settle into place.
How to Crochet the Bag Bottom
Use double strand yarn and 3.5mm hook

Round 1: Make a magic ring, chain 3 (counts as first double crochet), work 11 double crochet into the ring, slip stitch into the top of the starting chain-3 to join. (12 double crochet total)

Round 2: Chain 3 (counts as first double crochet), double crochet increase in the same stitch, double crochet increase in each stitch around, slip stitch into the top of the starting chain-3 to join. (24 double crochet total)

Round 3: Chain 3 (counts as first double crochet), (double crochet increase, double crochet) repeat around, slip stitch into the top of the starting chain-3 to join. (36 double crochet total)

Round 4: Chain 3 (counts as first double crochet), (double crochet increase, 2 double crochet) repeat around, slip stitch into the top of the starting chain-3 to join. (48 double crochet total)

Round 5: Chain 3 (counts as first double crochet), (double crochet increase, 3 double crochet) repeat around, slip stitch into the top of the starting chain-3 to join. (60 double crochet total)

Round 6: Chain 3 (counts as first double crochet), (double crochet increase, 4 double crochet) repeat around, slip stitch into the top of the starting chain-3 to join. (72 double crochet total)

Round 7: Chain 3 (counts as first double crochet), (double crochet increase, 5 double crochet) repeat around, slip stitch into the top of the starting chain-3 to join. (84 double crochet total)

Round 8: Chain 3 (counts as first double crochet), (double crochet increase, 6 double crochet) repeat around, slip stitch into the top of the starting chain-3 to join. (96 double crochet total)

Round 9: Chain 3 (counts as first double crochet), (double crochet increase, 7 double crochet) repeat around, slip stitch into the top of the starting chain-3 to join. (108 double crochet total)

Round 10: Chain 3 (counts as first double crochet), (double crochet increase, 8 double crochet) repeat around, slip stitch into the top of the starting chain-3 to join. (120 double crochettotal)

Round 11: Chain 3 (counts as first double crochet), (double crochet increase, 9 double crochet) repeat around, slip stitch into the top of the starting chain-3 to join. (132 double crochet total)

Round 12: Chain 3 (counts as first double crochet), (double crochet increase, 10 double crochet) repeat around, slip stitch into the top of the starting chain-3 to join. (144 double crochet)
Fasten off, leaving a long tail for sewing.

Tips: When using double-stranded yarn, make sure to keep both strands together consistently throughout your work for an even texture. Count your stitches at the end of each round to ensure accuracy. It's easy to miss an increase, especially in later rounds.
How to Connect the Bag Bottom to the Body Panels

Step 1: Place the bag bottom face down. Use stitch markers to align and secure the bottom with the body panels. This will make sewing easier.

Step 2: Use the bottom stitches as a guide. Pick up the inner half of each stitch from the bottom. Match it with the corresponding inner half stitch from the body panel. Use a whipstitch to join them.
Tips: You don't need to match every single stitch exactly

Step 3: Continue sewing around the entire circumference. When you've completed the circle, bring the thread to the wrong side. Weave in the ends to finish.
Tips: Periodically check that you're not pulling too tight as you sew. The bottom should lie flat without puckering.
How to Crochet the Bag Body
Use 3.0mm hook

Round 1: Chain 1, work a round of single crochet (ensure the single crochet count is a multiple of 3), slip stitch to join.

Round 2: Chain 3, [skip 2 stitches, (double crochet, chain, double crochet)] repeat until the last group, double crochet, chain 1, slip stitch to join.
Round 3: Chain 3, work 3 double crochet in each chain space, repeat until the last group, 2 double crochet, slip stitch to join.

Round 4-17: Repeat Round 2-3.

Round 18: Chain 1, work a round of single crochet without increasing or decreasing, slip stitch to join.
Lay the bag flat and fold in half to find the center point. Attach a stitch marker. Place stitch markers at the fifth pattern group to the left an right of the center. Locate the position for the bag strap.

Round 19: Chain 1, single crochet without increasing or decreasing until you reach the stitch marker, chain 120 for the strap, single crochet without increasing or decreasing to the other side of bag, at the corresponding strap position chain 120, connect to the other side of the strap position, single crochet to the end, slip stitch to join.

Round 20: Chain 1, decrease with a single crochet at the corner of the strap, single crochet without increasing or decreasing for the rest, slip stitch to join.
Round 21: Repeat Round 20.

Round 22: Chain 1, single crochet without increasing or decreasing for the rest, at the corner of strap, work three single crochet together as one stitch, slip stitch to join. Fasten off.
Tips: Use stitch markers to keep track of your rounds, especially during the repeating sections (Rounds 4-17). When creating the straps in Round 19, chain loosely to allow for some stretch. Count your chains carefully to ensure both straps are the same length.
How to Join Granny Squares
While I've used one simple joining method in this pattern, you might find another technique that better suits your style. I'm excited to share my comprehensive guide on 11 Ways to Join Granny Squares with you! I've detailed every method I know and love - each brings its own special touch to your finished piece. Let me help you discover which one works best for you!
How to Weave in Ends Crochet Granny Square
The secret for professional-looking granny squares is all about how you weave in those ends. I'm sharing 3 ways to weave in ends with you! These are techniques I've perfected over years of crocheting and use in all my projects. I'll show you exactly how I secure my ends to make sturdy, polished pieces that last. Trust me, once you master these finishing methods, your granny squares will look absolutely stunning!
Care and Cleaning Instructions
Daily Care Tips
Let's chat about keeping your new crochet bestie looking fresh. First off, remember that prevention is key. Try to avoid setting your bag on rough or dirty surfaces - nobody likes a scraped bottom! If you're heading out for a day of adventure, consider bringing a small pouch for messy items. If you spot a stain, don't panic! Just dab it gently with a damp cloth. Your bag will thank you for the TLC.
Washing Methods
When it's time for a deep clean, don't stress - I've got you covered! First things first: always check your yarn label for specific care instructions. In general, hand washing is your safest bet. Fill a sink with cool water and a smidge of mild detergent. Gently submerge your bag and swish it around - think of it as a relaxing bath for your creation! Rinse thoroughly until the water runs clear, then squeeze out excess water (no wringing, please!). Reshape your bag and let it air dry flat.
Storage Suggestions
Alright, let's talk bag hibernation! When your lovely crochet creation needs a break, treat it right. First, make sure it's completely dry and clean. Then, stuff it with acid-free tissue paper to help maintain its shape - think of it as a little pillow for your bag! Store it in a cool, dry place away from direct sunlight (we don't want any fading divas here). If you have the dust bag, use it! If not, a pillowcase works great too. And remember, no heavy items on top.

What’s Next?
Loved this granny square bucket bag tutorial? Why not spread the crochet joy? Share this pattern on Facebook, Pinterest, Instagram, or Twitter and inspire your crafty friends! Let's create a wave of handmade happiness together. Don't forget to tag your creations - I can't wait to see your unique spin on this adorable bag!