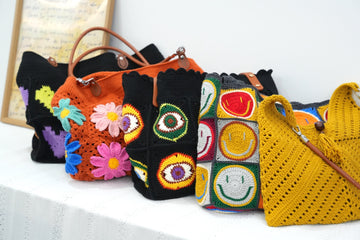
Welcome to this cozy corner where I'll show you how to create a chic black granny square bag that combines vintage charm with modern style. This versatile accessory is perfect for both casual outings and special occasions, featuring a timeless design that never goes out of fashion. The classic black color adds sophistication while making it easy to match with any outfit.
Don't worry if you're new to crocheting – I'll guide you through each step with detailed instructions and helpful photos. Ready to create something beautiful? Let's dive into this fun project together!
Pin for Later
Save this gorgeous black granny square bag pattern for your next crochet project – you'll love making it!

Details About Black Granny Square Bag
Let me walk you through the details of this lovely granny square bag that I'm excited to share with you!
Each granny square measures 3.9 inches, creating the perfect size for a statement piece without being overwhelming. You'll need to create 19 squares in total to bring this bag to life – it's just enough to keep you engaged without feeling like an endless project! When assembled, your finished bag will measure 10.6 inches in height and 12.4 inches in width, making it spacious enough for your daily essentials.
While this pattern showcases a classic all-black design that exudes sophistication, don't feel limited! You could try creating a striking contrast by working with two shades of black yarn, perhaps mixing matte and slightly shimmery textures. Or, if you're feeling adventurous, consider adding subtle pops of gray or silver for a modern twist. The beauty of this pattern is that it works wonderfully in any monochromatic scheme you choose.
Remember, the consistent square size is key to achieving that polished, professional look we're aiming for. Ready to get started on your new favorite accessory?
Recommended Yarn and Crochet Hooks
For our sophisticated Black Granny Square Bag, I'm absolutely in love with Loopara 5 ply milk cotton yarn, and let me tell you why!
This yarn is truly a crocheter's dream - it's incredibly soft yet maintains perfect structure, wonderfully durable for everyday use, and has just the right amount of body to keep your bag looking sharp. The black color in this yarn is particularly special - it has this subtle, sophisticated sheen that adds an extra touch of elegance to your granny squares.
For this project, we'll be using a 3.0mm hook - it's the perfect size to create tight, precise stitches that make your granny squares look absolutely professional. One of the best things about using this yarn for granny squares? The stitch definition is simply outstanding. Every detail of your squares will pop beautifully, creating that classic, timeless look we're aiming for. Plus, since it's cotton yarn, your bag will be completely washable - perfect for regular use!
Remember, while we're working with black for this classic design, feel free to experiment with different black yarn textures or even add subtle contrast if you're feeling creative. The joy of crochet is making something uniquely yours. Let's create something absolutely stunning together!
Materials needed for Black Granny Square Bag
- Yarn - Loopara 5ply combed cotton
- Hook - 3.0mm
- Scissors
- Label
- Strap
- Fiber fill
- Tweezers
- Yarn needle
- Stitch marker

Abbreviations (US Terms)
- Magic ring
- ch - chain
- sc - single crochet
- dc - double crochet
- sl - slip stitch
- dc inc - double crochet increase
- sc inc - single crochet increase
- tr inc - treble crochet increase
- hdc inc - half double crochet increase
- hdc - half double crochet
- tr - treble crochet
- sc2tog - single crochet 2 together
Black Granny Square Bag Layout

This layout showcases the black granny squares arranged in a thoughtful pattern for the bag. Each square is strategically positioned to create a classic, sophisticated design, with the squares forming a cohesive and elegant accessory. The arrangement helps you visualize how your squares will come together to create this timeless bag.
How to Crochet Black Granny Square Bag – Step by Step
Note: The tutorial uses different yarn colors for the crocheting and assembly processes. You can choose whatever color you like.
If you’re not crazy about our color palette, I put together two color-changing techniques that I use for all of my projects. Let me show you how to make these color transitions smooth and professional so you can bring your unique, creative vision to life.
How to Crochet the Square (Make 19)

Round 1: Magic ring. 8 single crochet in ring. Slip stitch to join in the first single crochet.

Round 2: Change color. 8 half double crochet increases. Slip stitch to join in first half double crochet.

Round 3: Change color. [Single crochet increase, 7 single crochet] twice. Slip stitch to join in first single crochet.

Round 4: Change color. (4 single crochet, half double crochet, double crochet increase, [treble increase, chain 3, treble increase], double crochet increase, half double crochet) twice. Slip stitch to join in first single crochet.

Round 5: Change color. 16 single crochet, chain 2, 18 single crochet, chain 2, 2 single crochet. Slip stitch to join in first single crochet.

Round 6: Change color. 2 single crochet, 3 half double crochet, 3 double crochet, treble crochet, 3 treble crochet in 1 stitch, chain 2, 3 treble crochet in 1 stitch, treble crochet, 3 double crochet, 3 half double crochet, 5 single crochet, 3 half double crochet, 3 double crochet, treble crochet, 3 treble crochet in 1 stitch, chain 2, 3 treble crochet in 1 stitch, treble crochet, 3 double crochet, 3 half double crochet, 3 single crochet. Slip stitch to join in first single crochet.

Round 7: Change color. 6 single crochet, single crochet increase, 13 single crochet, single crochet increase, 5 single crochet, 3 single crochet in next stitch, 5 single crochet, single crochet increase, 13 single crochet, single crochet increase, 5 single crochet, single crochet increase. Slip stitch to join in first single crochet.

Round 8: Change color. [Single crochet, 2 half double crochet, 3 double crochet, treble crochet, treble increase, chain 2, treble increase, treble crochet, 3 double crochet, 2 half double crochet] 4 times. Slip stitch to join in first single crochet.

Round 9: (17 double crochet, [2 double crochet, chain 2, 2 double crochet]) 4 times. Slip stitch to join in top of first double crochet. Fasten off, weave in ends.
Tips: Pay attention to the starting position of each round.
How to Crochet the Eyeball (Make 2)

Round 1: Create a magic ring, chain, 6 single crochet in ring, slip stitch.

Round 2: Change color, chain, 6 single crochet increase, slip stitch.

Round 3: Change color, (single crochet increase, 1 single crochet) repeat 6 times, slip stitch.

Round 4: (single crochet increase, 2 single crochet) repeat 6 times, slip stitch.

Round 5: Chain, 24 single crochet, slip stitch, chain.

Round 6: Chain, 24 single crochet, slip stitch, chain.

Round 7: Chain, 24 single crochet, slip stitch, chain.

Round 8: Chain, 24 single crochet, slip stitch, chain.

Round 9: Chain, 24 single crochet, slip stitch, chain.

Round 10: (single crochet 2 together, 2 single crochet) repeat 6 times, slip stitch, chain.

Round 11: (single crochet, single crochet 2 together) repeat 6 times, stuff with fiberfill, slip stitch, chain.

Round 12: 6 single crochet 2 together. Leave long tail for closing and sewing. Embroider blood vessels with red yarn. Make a chain to your desired length to connect the eyeballs.
Tips: Keep your stitches tight and stuff firmly when adding fiberfill to maintain a round shape.
Crochet Black Granny Square Bag Assemble
How to Seam the Main Body

Step 1: Arrange your completed granny squares. You'll need 19 squares total. Secure them in place with stitch markers.

Step 2: Place two granny squares back to back. Insert your hook into the first stitch. Create a standing stitch. Begin working single crochets in sequence. Repeat this process for each join.

Step 3: Pay special attention to transition at crossing points. Keep your tension loose to maintain bag shape. Continue with single crochet joining method.

Step 4: Work all squares along the first path. Fasten off when complete. Start the second path following the same pattern.

Step 5: Find the center line of the bag body. Fold in half. Secure both sides with stitch markers. The bag shape will now be visible.

Step 6: Begin joining the bottom edge of the bag. Work single crochets all around. Continue until you reach the first stitch. Slip stitch to join. Fasten off.

Step 7: Start new round at waistline. Work single crochets all around. Join with slip stitch. Fasten off.

Step 8: Begin edge joining, noting yarn entry points. Continue single crochet joins all around. Complete the join.

Step 9: Weave in remaining yarn tails. Thread through nearby stitches on inside. Hide all yarn ends securely.
How to Crochet the Bag Opening

Step 1: Begin with a standing stitch. Work single crochets in sequence. Pay attention to the transition spots between stitches.

Step 2: Hide yarn tails as you work. Repeat pattern all around. Connect with a slip stitch to first stitch.

Step 3: Single crochet for rounds 2 through 12. Maintain even tension for all 12 rounds. Join each round with a slip stitch.

Step 4: Skip 2 stitches to create a gap. Work 7 double crochets. This forms our scallop! Skip another 2 stitches. Slip stitch to secure. Keep repeating this sequence all around. Each scallop should have the same size. Continue until you reach the beginning. Join with a slip stitch to complete.

Step 5: Join with a slip stitch. Secure your work. Weave in all ends neatly.
How to Assemble the Bag Strap


Step 1: Position the leather strap in the right spot on the bag body. Secure with hardware. Put all hardware pieces together to complete the bag.
Tips: Before joining your squares, block them first for even sizing and crisp edges. Use stitch markers to align corners when connecting squares, and maintain consistent tension throughout assembly for a professional, polished finish.
How to Join Granny Squares
While I've used one simple joining method in this pattern, you might find another technique that better suits your style. I'm excited to share my comprehensive guide on 11 Ways to Join Granny Squares with you! I've detailed every method I know and love - each brings its own special touch to your finished piece. Let me help you discover which one works best for you!
How to Weave in Ends Crochet Granny Square
The secret for professional-looking granny squares is all about how you weave in those ends. I'm sharing 3 ways to weave in ends with you! These are techniques I've perfected over years of crocheting and use in all my projects. I'll show you exactly how I secure my ends to make sturdy, polished pieces that last. Trust me, once you master these finishing methods, your granny squares will look absolutely stunning!
Care and Cleaning Instructions
Daily Care Tips
Your black granny square bag deserves a little TLC! To keep it looking fabulous, give it a gentle brush with a lint roller occasionally to remove dust and fuzz. Keep it away from sharp objects that might snag the stitches, and avoid overloading it to maintain its beautiful shape.
Washing Methods
When your bag needs refreshing, hand wash it with love in cool water using a mild detergent. Gently squeeze (never wring!) to remove excess water, then reshape while damp. Let it air dry flat away from direct sunlight to prevent the black yarn from fading.
Storage Suggestions
Between adventures, store your bag in a cool, dry place. To maintain its structure, stuff it lightly with tissue paper when not in use. If you're storing it for a longer period, keep it in a breathable fabric bag – never plastic! – to protect it from dust while letting the yarn breathe.

What’s Next?
Love how your black granny square bag turned out? Share your beautiful creation with fellow crocheters! Pin it on Pinterest for later, post your progress on Instagram, share the joy on Facebook, or tweet about it on Twitter. Your crafty friends will thank you for spreading this timeless pattern! #CrochetBag


