Welcome to my favorite spring project - the Large Daisy Granny Square Bag!
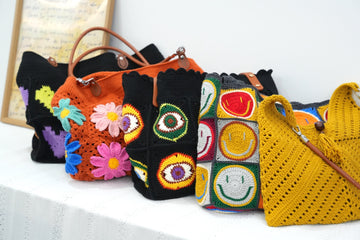
This cheerful design combines colorful daisy granny squares with a classic mesh pattern, creating a delightful floral arrangement against a warm terracotta background. Each daisy square brings its own personality - some in sweet pink, others in sky blue, mint green, and lavender - while delicate leaf details add that perfect natural touch. The leather handles complete the look with a sophisticated flair!
Ready to create your own blooming masterpiece? I'll guide you through each step with detailed instructions and clear photos - from crafting individual daisy squares to joining them into this beautiful garden-inspired tote.
Whether you're an experienced crocheter or new to granny squares, this pattern will help you create something truly special. Let's make something beautiful together!
Pin for Later
Pin this blooming large daisy tote pattern and bring a touch of springtime charm to your crochet collection! Let's create something that blooms all year round!

Details About Large Granny Square Bag
Let me share the delightful details of this large granny square bag with you!
Each daisy granny square measures approximately 4 inches (10 cm). You'll need to create 19 of these flowery squares in different colors - and arrange them on the terracotta mesh background. The finished bag measures roughly 15 inches (38 cm) in width and 13 inches (33 cm) in height, making it perfectly sized for everyday use or market trips.
For the color palette, I chose a warm terracotta as the base color which makes those colorful daisies really pop! The flower colors are inspired by a spring garden - soft pink like morning blooms, sky blue reminiscent of forget-me-nots, mint green for freshness, and gentle lavender adding that perfect touch of whimsy. The yellow centers tie all the flowers together, while the mint green leaves add that natural garden feel. The brown leather handles complement the terracotta base beautifully.
Feel free to play with colors though - try pastels for a soft, romantic look, bold brights for a modern twist, or stick to a monochromatic scheme with varying shades of your favorite color. The joy of this bag is making it reflect your personal style while keeping that cheerful garden vibe!
Recommended Yarn and Crochet Hooks
Here's your perfect yarn guide for creating the large tote bag!
I absolutely recommend Loopara 4 ply milk cotton yarn for this garden-inspired project. This yarn is perfect for those detailed daisy motifs - it has just the right texture to make each petal crisp and defined. For your palette, you'll need Loopara in terracotta for the base, an assortment of flower colors (pink, blue, mint green, and lavender), yellow for the cheerful centers, and mint green for those delicate leaves. What I love most about this yarn is how it maintains its shape while being soft enough to create a flexible, everyday bag.
For this project, we're actually using two different hook sizes to achieve the perfect finish. I use a 2.3mm hook for creating the daisy granny squares - this smaller size gives you beautifully defined stitches that make those flowers really pop! Then, switch to a 3.0mm hook when joining and finishing the bag. This combination creates a sturdy, well-structured tote that still has a lovely drape.
If you tend to crochet tightly, you might want to size up slightly, or if you're a loose crocheter, consider going down a size. The key is achieving consistent tension throughout - this will ensure your flowers look uniform and your bag holds its shape beautifully. Remember, taking time to get your tension right at the start will make a huge difference in your finished piece!
Materials needed for Large Granny Square Bag
- Yarn– Loopara 4ply combed cotton
- Hook- 3.0mm
- Scissors
- Yarn needle
- Leather D buckle
- Leather shoulder strap

Abbreviations (US Terms)
- ch - chain
- sc - single crochet
- dc - double crochet
- hdc - half double crochet
- sl - slip stitch
- bpsc - back post single crochet
- inc - increase
- st - stitch
Large Granny Square Bag Layout

This is the layout pattern for the Large Granny Square Bag, showing how 19 daisy squares are arranged in a T-shape formation. The green lines indicate the fold lines for creating the bag structure. This arrangement ensures proper shaping and seamless assembly of your finished tote.
How to Crochet Large Granny Square Bag – Step by Step
Note: The tutorial uses different yarn colors for the crocheting and assembly processes. You can choose whatever color you like.
If you’re not crazy about our color palette, I put together two color-changing techniques that I use for all of my projects. Let me show you how to make these color transitions smooth and professional so you can bring your unique, creative vision to life.


Round 1 (Center): Start with a magic ring, chain 3 (counts as first double crochet), work 16 double crochet stitches into the ring. Join with a slip stitch. Fasten off and weave in ends.

Round 2 (Daisy Petals): Join yarn with a chain stitch. Work (2 single crochet, chain 7, work 6 single crochet in second chain from hook) 8 times around. Join with a slip stitch to beginning stitch.

Round 3: Join with slip stitch, chain 1. Work (single crochet, single crochet, half double crochet, 2 double crochet, double crochet increase, 3 double crochet in one stitch, 3 double crochet in one stitch, double crochet increase, 2 double crochet, half double crochet, single crochet) 8 times around. Join with slip stitch. Fasten off and weave in ends.


Round 4 (Starting Granny Square): Working in back of single crochet from Round 3, work (back post single crochet, chain 5) 8 times around. Join with slip stitch.

Round 5: Slip stitch, work (chain 3, 2 double crochet, chain), 3 double crochet in one stitch, chain. Then work [(3 double crochet, chain 2, 3 double crochet, chain), (3 double crochet in one stitch, chain)] 3 times. Work 3 double crochet, join with half double crochet.

Round 6: Work (chain 3, 2 double crochet, chain), (3 double crochet in one stitch, chain) twice. Work [(3 double crochet, chain 2, 3 double crochet, chain), (3 double crochet in one stitch, chain) twice] 3 times. Work 3 double crochet, join with half double crochet.


Round 7: Work (chain 3, double crochet joining petal, double crochet, chain), (3 double crochet in one stitch, chain) 3 times. Work [(double crochet, double crochet joining petal, double crochet, chain 2, double crochet, double crochet joining petal, double crochet, chain), (3 double crochet in one stitch, chain) 3 times] 3 times. Work (double crochet, double crochet joining petal, double crochet), join with half double crochet.


Round 8: Work (chain 3, 2 double crochet, chain), (3 double crochet in one stitch, chain), 3 double crochet in one stitch, double crochet joining petal, (3 double crochet in one stitch, chain) twice. Work [(3 double crochet, chain 2, 3 double crochet, chain), (3 double crochet in one stitch, chain), 3 double crochet in one stitch, double crochet joining petal, (3 double crochet in one stitch, chain) twice] 3 times. Work 3 double crochet, join with half double crochet.

Round 9: Chain 3, double crochet, work 23 double crochet, [(2 double crochet, chain 3, 2 double crochet), 23 double crochet] 3 times, 2 double crochet, chain 3. Join with slip stitch. Fasten off and weave in ends.
Tips: Before starting your daisy granny square, make sure your magic ring is tight. Keep consistent tension for even petals, and count your stitches carefully when creating the flower center for a perfect daisy shape.
Large Granny Square Bag Assemble
How to Seam Bag

Step 1: First, place your granny squares according to the picture and secure with stitch markers. Follow the seaming order shown in the picture. I'm using single crochet with 3 chain stitches, but feel free to try other methods!

Step 2: Place two granny squares face-to-face, starting from the diagonal braid position. Insert hook, pull up a loop, and begin matching stitches with single crochet and 3 chains. Keep your working yarn loose to maintain the bag's shape. At crossing points, work 2 single crochets directly. Continue this pattern until all sections are complete. Work horizontal and vertical lines with single crochet seams. After completing two long vertical seams, check your progress.


Step 3: Fold at the center point. Use stitch markers to shape the bag. Single crochet along each edge. Fasten off, leaving ends for later weaving. Finally, seam the horizontal line using the same method. Weave in all loose ends on the back.
How to Crochet Bag Opening

Step 1: Start in any chain space with 3 chains, then 2 double crochets. Repeat (1 chain, 3 double crochets) around.

Step 2: Chain 4, then (3 double crochets, 1 chain) around.

Step 3: Repeat the previous round.

Step 4: Start with 3 chains as your first stitch. Match double crochets to previous stitches. Work one double crochet in each chain space. Repeat for three rounds.

Step 5: Single crochet in each stitch for seven rounds. Work one round of reverse single crochet. Fasten off and weave in ends.
How to Attach Leather D buckles


Step 1: Split main color yarn into two strands, then thread your needle and secure the tail. Place the leather D buckle at a distance of 16 single crochets from both sides (This distance is for reference only and can be adjusted by yourself). Adjust spacing as needed and sew buttons securely. Weave in ends thoroughly.

Step 2: Repeat for the remaining buckles. After all the buckles are attached successfully, install two Leather shoulder straps onto the D buckles. Congratulations! You've completed the large granny square bag!
Tips: When assembling your daisy tote, remember to use plenty of stitch markers and keep your seaming tension loose for proper shaping. For the bag opening, maintain consistent tension across all rounds to create a sturdy edge. When attaching buckles, secure them extra firmly and double-check your spacing – they're crucial for the bag's functionality. Always weave in ends thoroughly.
How to Join Granny Squares
While I've used one simple joining method in this pattern, you might find another technique that better suits your style. I'm excited to share my comprehensive guide on 11 Ways to Join Granny Squares with you! I've detailed every method I know and love - each brings its own special touch to your finished piece. Let me help you discover which one works best for you!
How to Weave in Ends Crochet Granny Square
The secret for professional-looking granny squares is all about how you weave in those ends. I'm sharing 3 ways to weave in ends with you! These are techniques I've perfected over years of crocheting and use in all my projects. I'll show you exactly how I secure my ends to make sturdy, polished pieces that last. Trust me, once you master these finishing methods, your granny squares will look absolutely stunning!
Care and Cleaning Instructions
Daily Care Tips
Keep your bag looking fresh with regular gentle care. After each use, lightly brush the surface with a soft cloth to remove dust and debris, paying special attention to the textured flower motifs. Check the seams and handles periodically for any loose threads. Avoid overloading your bag, as this helps maintain the shape of both the granny squares and the overall structure.
Washing Methods
When your bag needs cleaning, treat it with appropriate care to preserve those beautiful daisy details. For light soiling, spot clean with a white cloth dampened with cool water and mild wool detergent. If deeper cleaning is needed, hand wash in cool water with gentle detergent. Never twist or wring the bag; instead, press out excess water between clean towels. Reshape while damp and dry flat away from direct sunlight to prevent color fading. Allow to dry completely before use.
Storage Suggestions
Store your bag properly to maintain its charm between uses. Ensure it's completely clean and dry before storing. Gently stuff with acid-free tissue paper to help maintain shape and prevent creasing. Store flat or standing upright in a clean, dry place away from direct sunlight. Use a cotton storage bag rather than plastic to allow the fibers to breathe. For long-term storage, avoid hanging by the handles to prevent stretching. These simple steps will help ensure your bag stays beautiful for years to come.

What’s Next?
Share this blooming Large Daisy Granny Square Bag pattern across your social platforms! Whether it's Pinterest, Facebook, Instagram, or Twitter, inspire fellow crocheters with this garden-fresh design. Let's spread the joy of handmade floral accessories together!


