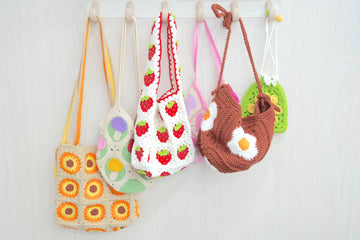
Looking for a charming and whimsical crochet project? Let me introduce you to this delightful Daisy Granny Square Bag - where vintage florals meet everyday functionality! This sweet bag features lovely daisy motifs nestled within classic granny squares, creating a unique piece that's bursting with springtime charm and handmade warmth.
Whether you're meeting friends for coffee or enjoying a picnic in the park, this bag adds that perfect touch of handcrafted happiness to your day. The best part? I'll guide you through each step with clear, detailed instructions and helpful photos to make your crafting journey a breeze.
Ready to create your own blooming beautiful bag? Grab your hook and favorite yarns, and let's start this lovely project together!
Pin for Later
Save this Daisy Granny Square Bag pattern for your next cozy crafting session - you won't want to lose it!

Details About Daisy Granny Square Bag
Let's dive into all the delightful details of our Daisy Granny Square Bag!
Each granny square measures 2.9 inches - the perfect size to showcase those charming daisy motifs while keeping our bag beautifully proportioned. For this lovely design, we'll be creating 18 squares in total: 9 for the front and 9 for the back, forming a beautiful garden of daisies when joined together!
Once assembled, your finished bag will measure approximately 10 inches in height and 9.2 inches in width. It's a wonderfully practical size that's perfect for carrying your daily essentials while showing off your handmade masterpiece!
Now, let's talk about the fun part - colors! In our example, I've used a dreamy light yellow background that lets the white daisy petals and cream centers truly bloom. But don't feel limited! How about a soft pink background for a romantic garden feel? Or perhaps a sunny yellow base to make those daisies pop? The possibilities are endless - choose colors that bring a smile to your face and match your personal style!
Remember, this bag is your creative canvas, so have fun playing with different color combinations to make it uniquely yours!
Recommended Yarn and Crochet Hooks
Let's talk about the good stuff - yarn and hooks for our charming Daisy Granny Square Bag!
First up, yarn choices. I'm absolutely smitten with Loopara 5 ply milk cotton yarn for this project. It's delightfully soft and has the perfect weight for a bag you'll love using daily. Plus, it's incredibly versatile - the stitch definition is amazing, making those sweet daisy motifs really bloom!
For our bag, we're using a dreamy light yellow as the base color, pure white for the daisy petals, and cream for the centers. But don't let that limit your creativity! How about a soft pink background with white daisies for a romantic garden feel? Or perhaps a natural ecru base with colorful daisies for a cheerful, bohemian look? The options are endless with this gorgeous yarn!
Now, let's talk hooks. We're using a 3.0mm hook for this project, which pairs perfectly with our 5 ply yarn. This size creates just the right tension for granny squares that are sturdy enough for a functional bag while maintaining that beloved, delicate daisy texture.
Speaking of granny squares - they're just perfect for this project, aren't they? They work up quickly, they're fantastic for playing with color combinations, and they create such a charming vintage-meets-modern vibe. Plus, once you start making these adorable daisy squares, you won't want to stop!
Materials needed for Daisy Granny Square Bag
- Yarn – Loopara 5ply combed cotton
- Hook – 3.0mm
- Scissors
- Stitch marker
- Yarn needle

Abbreviations (US Terms)
- ch - chain
- sc - single crochet
- dc - double crochet
- hdc - half double crochet
- sl - slip stitch
- bo - bobble stitch
- sc inc - single crochet increase
- dc bo - double crochet bobble stitch
Daisy Granny Square Bag Layout

This layout demonstrates the assembly pattern for one side of the Daisy Granny Square Bag, showing how 9 flower squares should be arranged. Each stitch combination works together to create delicate daisy motifs at the center of each granny square, which will then be joined to form your beautiful bag panels.
How to Crochet Daisy Granny Square Bag – Step by Step
Note: The tutorial uses different yarn colors for the crocheting and assembly processes. You can choose whatever color you like.
If you’re not crazy about our color palette, I put together two color-changing techniques that I use for all of my projects. Let me show you how to make these color transitions smooth and professional so you can bring your unique, creative vision to life.

Round 1: Chain 3, work 11 double crochet into the ring. Join with a slip stitch to the top of beginning chain-3.


Round 2: Change to center color. Chain 3, work 2 double crochet bobble stitch, chain 2. Work (bobble stitch, chain 2) 11 times around. Join with a slip stitch to the top of beginning chain-3.

Round 3: Change to petal color. Chain 3, work 2 double crochet, chain 3, work 3 double crochet. Work (3 half double crochet in first stitch) twice. Repeat (3 double crochet, chain 3, 3 double crochet, work (3 half double crochet in first stitch) twice) 3 times around. Join with a slip stitch to the top of beginning chain-3.

Round 4: Change to background color. Chain 3, work 1 double crochet, chain 1, work 2 double crochet. Work 12 double crochet. Repeat (12 double crochet, 2 double crochet, chain 1, 2 double crochet) 3 times around. Join with a slip stitch to the top of beginning chain-3. Fasten off and weave in all ends.
Tips: Keep your tension consistent and weave ends securely.
Crochet Daisy Granny Square Bag Assemble

Step 1: Follow the roll stitch method shown in Figure 1. Align stitches precisely. Place flower panels back-to-back. Pick up half of each inner stitch for the roll stitch.

Step 2: Sew the first stitch twice in the same hole to prevent unraveling. Don't pull the thread too tight to maintain the bag's shape.

Step 3: Continue sewing, matching stitches one-by-one.

Step 4: Connect two more panels. Tighten the loops when connecting. Sew the first stitch twice.

Step 5: Continue sewing, matching stitches. Sew an extra stitch at the end. Leave a long thread for further sewing. Cut the thread.

Step 6: Repeat the process for the other row of panels.

Step 7: Sew the vertical rows of panels. Follow the arrangement in Figure 2. Use the roll stitch method.

Step 8: When connecting the middle, join 4 panels. Sew an extra round here.

Step 9: Continue sewing, matching stitches until finished.

Step 10: Repeat this sewing method for the other 9 panels.

Step 11: Connect the front and back. Follow Figure 3 for roll stitch sewing. Sew an extra stitch at the end. Don't cut the thread, hide it instead.

Step 12: Follow Figure 4 for roll stitch sewing. Sew an extra stitch at the end. Don't cut the thread, hide it instead.

Step 13: Crochet two rounds of single crochet at the bottom. Use unfinished single crochet to connect the middle seam of the first row. Crochet a normal round of single crochet for the second row.


Step 14: Chain 42, 40 single crochet in second chain from hook, 3 single crochet in 1 stitch, 39 single crochet, single crochet increase. Chain 1, single crochet increase, 39 single crochet, 3 single crochet increase, 39 single crochet, 2 single crochet increase. Chain 1, single crochet, single crochet increase, 39 single crochet, 3(single crochet, single crochet increase), 39 single crochet, 2(single crochet, single crochet increase).

Step 15: Connect the bottom to the bag body. Match stitches and use slip stitch to join.

Step 16: Crochet 3 rounds of single crochet at the bag opening. Use unfinished single crochet to connect the middle seam of the first row. Crochet normal rounds for the second and third rows.

Step 17: Attach the bag strap.
Tips: Line up your daisy squares carefully before joining - keep the flowers aligned for that perfect garden effect! Use the roll stitch method and maintain even tension while joining.
How to Join Granny Squares
While I've used one simple joining method in this pattern, you might find another technique that better suits your style. I'm excited to share my comprehensive guide on 11 Ways to Join Granny Squares with you! I've detailed every method I know and love - each brings its own special touch to your finished piece. Let me help you discover which one works best for you!
How to Weave in Ends Crochet Granny Square
The secret for professional-looking granny squares is all about how you weave in those ends. I'm sharing 3 ways to weave in ends with you! These are techniques I've perfected over years of crocheting and use in all my projects. I'll show you exactly how I secure my ends to make sturdy, polished pieces that last. Trust me, once you master these finishing methods, your granny squares will look absolutely stunning!
Care and Cleaning Instructions
Daily Care Tips
Want to keep your darling Daisy Granny Square Bag looking fresh and lovely? It's super easy! Give it a gentle reshape after each use to maintain those beautiful flower motifs. If you spot any loose ends, simply tuck them in with your crochet hook. A quick fluff and air-out keeps it perky and pristine!
Washing Methods
When your bag needs a refresh, here's the gentle way: Always hand wash with love using cool water and mild detergent (think delicate-friendly!). Gently swish - no rough handling! Squeeze out excess water by rolling in a clean towel, then reshape and lay flat to dry. Remember: never wring or twist - those precious daisies need gentle care!
Storage Suggestions
Give your bag a happy home when it's taking a break! Store in a cool, dry spot away from direct sunlight. I love stuffing mine with acid-free tissue paper to help maintain its shape and protect those lovely daisies. Pop it into a cotton pillowcase to keep dust away while letting it breathe. A sweet sachet added inside keeps everything fresh and lovely!

What’s Next?
Did you enjoy making this sweet Daisy Granny Square Bag? Share your beautiful creation with other crochet lovers! Tag me on Instagram, pin it to your DIY board on Pinterest, share the joy on Facebook, or tweet your finished bag on Twitter - I'd love to see how yours turned out! #DaisyGrannyBag #CrochetCommunity


