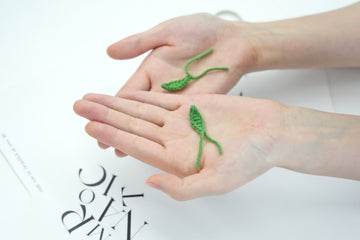
Hey there, fellow crochet enthusiasts! Today, I'm thrilled to share with you a project that's bloomed straight from my garden-loving heart: the Tulip Leaf.
Inspired by the elegant, lance-shaped leaves of these springtime favorites, this pattern is perfect for beginners looking to add a touch of nature to their crafts. You'll be leafing through this project in no time - it takes just about 30 minutes to complete!
Did you know that tulip leaves can actually sense light and will bend towards it? Well, with this pattern, you'll be bending hooks and yarn to create your very own evergreen tulip companion. Let's dig in and get growing!
Pin for later
Pin this Tulip Leaf pattern and add a touch of spring to your crochet projects year-round!

Details & Usage
This charming crocheted Tulip Leaf measures about 4 inches (10 cm) long and 0.8 inches (2 cm) at its widest point, making it a versatile addition to your crafting repertoire.
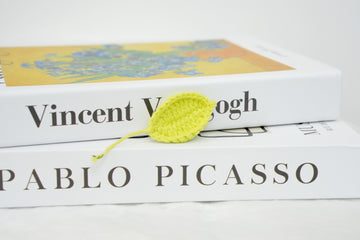
You can use these leaves in so many fun ways! Attach them to crocheted flower stems for a complete tulip bouquet that never wilts, or scatter them around your spring table setting for a fresh, natural touch. They make lovely bookmarks too – just add a ribbon or tassel to the stem end.
Want to jazz up your wardrobe? Sew a few onto a plain tote bag or hat for an instant spring makeover. These leaves also work great as appliques for pillows, blankets, or even a garden-themed baby mobile. For a unique touch to your gift wrapping, use them as eco-friendly gift toppers.
The possibilities are as endless as your imagination!
Materials Needed
- Yarn - Loopara 4ply combed cotton (Green 15)
- Hook - 2.5mm
- Iron wire - 0.5mm diameter
- Scissors

Abbreviations (US Terms)
- ch - chain
- sc - single crochet
- hdc - half double crochet
- dc - double crochet
- sl st - slip stitch
- Working with wire
- Working in the round
Crochet Tulip Leaf Pattern

Step 1: Chain 31, adding wire to the last chain for support. This wire will give your leaf structure and allow for shaping.
Step 2: Slip stitch in the 2nd chain from the hook to begin forming the leaf.
Step 3: Work 2 single crochets, then 3 half double crochets. This creates a gradual increase in height.
Step 4: For the main body of the leaf, work 18 double crochets in a row.
Step 5: Taper down with 3 half double crochets, then 2 single crochets.
Step 6: Create the leaf tip by working 3 single crochets in the next stitch.

Step 7: Mirror the first half: 2 single crochets, 3 half double crochets, 18 double crochets, 3 half double crochets, and 2 single crochets.

Step 8: Slip stitch to the first stitch to join. Fasten off and weave in ends.

Tips: To conceal the wire, wrap the yarn around it an extra time when working the slip stitch at the leaf's base. This helps create a neater finish and keeps the wire from showing through.
Variations
While the classic tulip leaf shape is beautiful on its own, why not let your creativity bloom?
Try experimenting with different leaf sizes by adjusting your starting chain length - shorter for cute mini leaves or longer for dramatic statement pieces. You could also play with the stitch counts to create broader or slimmer leaves. For a fun twist, try a wavy edge by adding picot stitches along one side.
As for embellishments, the sky's the limit! Consider embroidering delicate veins onto your leaf for added realism, or attach tiny beads for a touch of dew-kissed sparkle. You could even crochet small flowers or buds to attach to your leaf, creating a whimsical garden scene. Don't be afraid to mix different shades of green yarn for a variegated effect, or use unexpected colors for a more artistic interpretation.
Remember, in the world of crochet, there are no rules - let your imagination run wild and see what unique leaf creations you can come up with!
What's Next?
Hey crochet enthusiasts! Just hooked up a gorgeous Tulip Leaf? Don't keep that green goodness to yourself! Snap a pic and share it on Facebook, Pinterest, Instagram, or Twitter with #CrochetTulipLeaf. Whether you're a beginner or a pro, your creation could inspire others to give it a try. Show off your color choices, creative variations, or how you're using your leaf in projects. Let's turn social media into a virtual crochet garden! Your post might be the nudge someone needs to start their own leafy adventure. Together, we can spread the joy of crochet, one leaf at a time. Ready to let your creation bloom online?


