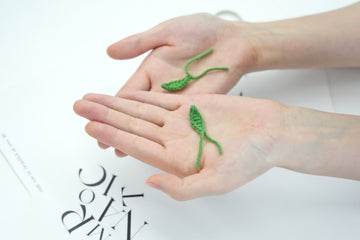
Hey there, crochet fans! Ready to leaf through a fun new pattern? Today we're diving into the world of regular hairpin leaves - style 2.
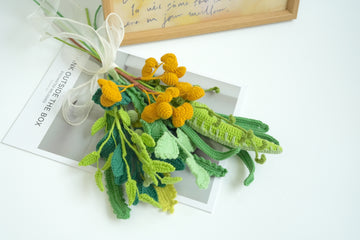
These versatile little cuties are perfect for adding a touch of nature to any project, and the best part? They're not just for flowers! You can use them as leaves for your crochet bouquets or turn them into actual hairpins. Talk about a two-for-one deal!
I got the idea for these while watching leaves dance in the breeze outside my window. There's something so elegant about those simple, smooth-edged leaves you see on plants like olive trees or willows, isn't there? I thought, "Why not bring that beauty into our crochet world?"
This pattern is great for beginners looking to branch out or intermediate crocheters wanting a quick, satisfying project. You'll be working with a hairpin loom and some basic stitches. Don't worry if you're new to hairpin lace - it's easier than it sounds! Once you get the hang of it, you can create one of these leaves in about 10-15 minutes.
So, ready to turn over a new leaf in your crochet journey? Grab your hooks, and let's grow a garden of possibilities!
Pin for later

Save this pattern for your next project - you'll want these versatile hairpin leaves adding a natural touch to your crochet creations (or hair!) soon!
Details & Usage
The finished Regular Hairpin Leaf (Style 2) typically measures about 1 inch (2.5-3cm) in length and 0.3 inches (1cm) at its widest point, though you can easily adjust the size by changing your yarn or loom width. These versatile leaves are perfect for a variety of projects, both as decorative elements and functional accessories.
You can use these leaves to add a natural touch to your crochet flower bouquets or garlands, creating realistic-looking foliage that won't wilt. They're also great for embellishing hats, bags, or clothing - just stitch them on for an instant botanical accent. If you're feeling crafty, why not turn them into actual hairpins? Just attach them to a clip or pin base, and you've got a unique hair accessory.
These leaves also work wonderfully in home decor projects. Use them to create a leafy wreath, scatter them on a table for a nature-inspired centerpiece, or incorporate them into a wall hanging. For those who enjoy miniature gardens or dollhouses, these leaves can add the perfect finishing touch to your tiny landscapes. The possibilities are as endless as your imagination - so go ahead and let your creativity bloom with these charming hairpin leaves!
Materials needed for
- Yarn – Loopara 4ply combed cotton (Green 12)
- Hook – 2.0mm
- Scissors

Abbreviations (US Terms)
- ch - chain
- sl - slip stitch
- sc - single crochet
- hdc - half double crochet
- dc - double crochet
Crochet Regular Hairpin Leaf Style 2 Pattern

Chain 9. This forms the base of your leaf. Starting from the second chain from the hook, work a slip stitch. In the next stitch, make a single crochet. Follow with a half double crochet in the next stitch. Work 2 double crochets in the next two stitches. Then, work a half double crochet in the next stitch, followed by a single crochet in the next. Finish with a slip stitch in the last stitch. Fasten off and weave in your ends.
Tips: When working this leaf, pay attention to your tension, especially as you transition between different stitches. This will help maintain the leaf's smooth, natural shape. For a more realistic look, try using a hook size slightly smaller than recommended for your yarn - this will create a tighter, more defined leaf. If you're planning to use these as actual hairpins, consider adding a thin wire along the chain before you start stitching to make the leaf more moldable.
Variations
Let's spice up our Regular Hairpin Leaf (Style 2) with some fun variations! Want a longer, more slender leaf? Try increasing your initial chain count and adjusting the stitch pattern accordingly. For a wider leaf, add more increases in the middle section. You could even experiment with a pointed tip by working a few extra stitches at the end.
But why stop at shape changes? Let's talk embellishments! How about adding some texture with surface crochet to create "veins" on your leaf? A few well-placed French knots could mimic little leaf buds or spots. If you're feeling fancy, try using a variegated yarn for a multi-toned leaf effect, or work with two similar shades to add depth.
And here's a fun idea - why not turn these leaves into actual accessories? Attach a small clip or pin to the back, and voila! You've got a unique, nature-inspired hair accessory or brooch. Or string a few together to make a leafy garland or necklace.
Remember, in nature, no two leaves are exactly alike, so don't be afraid to let your creativity run wild and make each leaf uniquely yours!
What’s Next?
Hey crochet pals! Just whipped up these adorable Regular Hairpin Leaves (Style 2) and I'm buzzing with excitement! If you're loving these versatile little greenies as much as I am, why not spread the leafy love?
Share this free pattern on your Facebook, Pinterest, Instagram, or Twitter and let's start a crochet nature revolution! Use #RegularHairpinLeaf or #CrochetNature to connect with fellow crafters.
Your shared pattern might inspire a whole forest of crochet creations! Let's turn our feeds into a lush garden of handmade leaves and hairpins!


