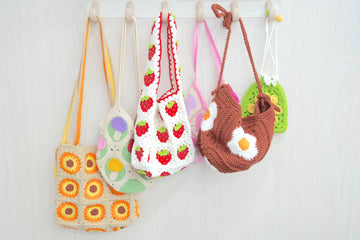
Bring the warmth of a sunflower field to your everyday style with this charming granny square tote! Featuring 12 vibrant sunflower squares against a crisp white background, this bag combines classic crochet techniques with a playful summer design. The wooden handles add a touch of natural elegance, while the textured petals create a delightful 3D effect.
Ready to create your own piece of sunshine? I'll guide you through each step with detailed photos and clear instructions, from crafting the perfect sunflower motif to assembling your finished bag. Whether you're a confident beginner or seasoned crocheter, this pattern will help you create a bag that's sure to brighten everyone's day!
Pin for Later
Pin this cheerful sunflower tote bag pattern - the perfect summer project to add a touch of sunshine to your crochet collection!

Details About Sunflower Granny Square Bag
Each sunflower granny square measures 12cm x 12cm (about 4.7 inches), and you'll need 12 squares to create the main panels - four for the front, four for the back, and four for the sides. Plus, one solid-colored square for the base to give your bag extra stability.
When assembled, your finished bag will measure approximately 14.5cm wide and 15.5cm tall (about 5.7 x 6.1 inches) - the perfect size for a charming everyday accessory or a delightful gift! The squared bottom and structured design ensure your bag stands beautifully while being practical for daily use.
For the color scheme, I've used a classic sunflower palette that really makes the design pop: bright marigold yellow for the petals, rich brown for the centers, and fresh green for the leaves, all set against a crisp white background. But don't feel limited by my choices! Consider a rustic farmhouse look with cream background and golden petals, or go modern with a gray background and orange petals. For a wildflower feel, try mixing different yellows and oranges in your petals, or embrace autumn vibes with rust-colored petals against a beige background. Remember, the joy of this pattern is in creating something that reflects your personal style!
Recommended Yarn and Crochet Hooks
I highly recommend using Loopara 5-ply milk cotton yarn for this project - it's absolutely perfect for creating structured bags. The milk cotton blend gives you the best of both worlds: the sturdiness needed for a bag while maintaining a beautiful, soft drape. Plus, it comes in vibrant, consistent colors that really make those sunflowers pop!
For your color palette, you'll need white for the background, bright yellow for your sunflower petals, dark brown for the centers, and green for the leaves. What makes milk cotton yarn especially great for this project is its excellent stitch definition, which helps showcase those lovely textured petals and detailed granny square patterns.
As for hooks, I recommend using a 3.0mm hook throughout the project. This size creates a nice, tight fabric that's essential for a bag - you don't want your small items slipping through the stitches! The tighter gauge also helps your bag maintain its shape and increases its durability. When working with this hook size, your granny squares will have just the right amount of structure while still maintaining enough flexibility to create a functional, beautiful bag.
Materials needed for Sunflower Granny Square Bag
- Yarn– Loopara 5ply combed cotton
- Hook- 3.0mm
- Scissors
- Yarn needle
- Stitch marker
- Lining cloth
- Sewing thread
- Small wooden beads
- D-shaped portable accessories
- Leather label
- Grid board

Abbreviations (US Terms)
- ch - chain
- sc - single crochet
- dc - double crochet
- hdc - half double crochet
- tr - treble crochet
- FPdc - front post double crochet
- BPdc - back post double crochet
- bo - bobble stitch
- pic - picot stitch
- dc2tog - double crochet 2 together
- dc3tog - double crochet 3 together
- sl st - slip stitch
Sunflower Granny Square Bag Layout

This layout shows how to arrange and join 12 sunflower granny squares for the bag construction. The red lines indicate horizontal seams, while green lines show vertical seams, clearly mapping out how the squares should be connected to form the bag's front, back, and sides.
How to Crochet Sunflower Granny Square Bag – Step by Step
Note: The tutorial uses different yarn colors for the crocheting and assembly processes. You can choose whatever color you like. If you’re not crazy about our color palette, I put together two color-changing techniques that I use for all of my projects. Let me show you how to make these color transitions smooth and professional so you can bring your unique, creative vision to life.
How to Crochet the Regular Square (Make 12)

Round 1: Create a magic ring. Chain 3 (counts as first double crochet), work 15 double crochet into the ring. Slip stitch to join at the top of chain 3.

Round 2: Chain 2, work (2 double crochet bobble stitch), chain 1, work (3 double crochet bobble stitch) 15 times, chain 1. Slip stitch to join.

Round 3: Change color, chain 1, work (single crochet, chain 4 picot, single crochet) 16 times. Slip stitch to join.

Round 4: [Chain 1, work (single crochet, half double crochet, 2 double crochet, chain 2 picot, 2 double crochet, half double crochet, single crochet), chain 1, slip stitch] 16 times.

Round 5: Change color, chain 5, [work double crochet (working into one loop of bobble stitch from round 2), chain 2] 15 times. Slip stitch to join.

Round 6: [Chain 1, single crochet increase, chain 2, single crochet, chain 2, (single crochet, chain 4 picot, single crochet), chain 2, single crochet, chain 2] 4 times. Slip stitch to join.

Round 7: Chain 1, [2 single crochet, chain 2, single crochet (5 double crochet, chain 2, 5 double crochet), single crochet, chain 2] 4 times. Slip stitch to join.

Round 8: [2 single crochet, chain 2, double crochet 2 together (1 double crochet in single crochet, skip 1, 1 double crochet in next stitch), 3 double crochet increase, (2 double crochet, chain 2, 2 double crochet), 3 double crochet increase, double crochet 3 together (skip 1, 1 double crochet in single crochet), chain 2] 4 times. Slip stitch to join.

Round 9: Change color, chain 5, [treble crochet, double crochet, chain 2 (skip 2), single crochet, chain 2 (skip 2), slip stitch, chain 2 (skip 2), (single crochet, chain, single crochet), chain 2 (skip 2), slip stitch, chain 2 (skip 2), single crochet, chain 2 (skip 2), double crochet, treble crochet, chain] 3 times. Work treble crochet, double crochet, chain 2 (skip 2), single crochet, chain 2 (skip 2), slip stitch, chain 2 (skip 2), (single crochet, chain, single crochet), chain 2 (skip 2), slip stitch, chain 2 (skip 2), single crochet, chain 2 (skip 2), double crochet. Slip stitch to join.

Round 10: Chain 1, [13 single crochet, (3 single crochet in the corner), 10 single crochet] 4 times. Slip stitch to join.

Round 11: Chain 1, [14 single crochet, (3 single crochet in the corner), 11 single crochet] 4 times. Slip stitch to join.
Tips: Weave in ends as you go when changing colors rather than leaving them all for the end. Keep consistent tension for bobble stitches to achieve even, puffy petals. Work corner stitches into chain spaces for crisp square edges.
Crochet Sunflower Granny Square Bag Assemble
How to Sew the Panels

Step 1: Begin by joining the four main panels using a whipstitch technique. Start with two panels side by side. Take your yarn and thread through both panels' back loops twice at the starting point to secure. Continue whipstitching through the back loops of both panels. When you reach crossing points, pull the yarn slightly tighter to prevent gaps. Join the remaining panels using the same method. Complete all four panels following this technique.

Step 2: Cut your plastic grid to match the size of your joined panels exactly. Place the grid behind your crocheted panels. Work single crochet stitches around the entire perimeter of the grid and panels. Make three single crochets in each corner for proper shaping. Repeat this process for all joined panel sections.

Step 3: Place your completed panel section on top of the lining fabric. Mark the fabric around the panel, leaving a 1-centimeter seam allowance. Cut the lining fabric following your marks. Position the cut lining behind the panel. Fold the edges of the lining and secure with clips. Thread your sewing needle with matching thread. Use a backstitch method, catching four crochet stitches at a time. On the lining side, work back two stitches before moving forward again. Continue this pattern around the entire piece.
How to Make the Bag Bottom

Row 1: Chain 28, work 27 single crochet starting in 2nd chain from hook.
Row 2: Chain 3 (counts as first dc), turn, work 26 double crochet.
Row 3: Chain 3 (counts as first dc), turn, [(front post double crochet, double crochet)] 13 times.
Row 4: Chain 3 (counts as first dc), turn, [(back post double crochet, double crochet)] 13 times.
Row 5: Repeat rows 3 and 4 fourteen more times.
Row 6: Chain 3 (counts as first dc), turn, work 26 double crochet.
Row 7: Chain 1, turn, work 27 single crochet.
How to Assemble the Bag

Step 1: Add the grid board and lining fabric using the same method as before.

Step 2: Use whip stitch through all loops with wrong sides together, matching stitches carefully. Double stitch at the beginning and pull slightly tight. When reaching corners, secure with extra stitch and pull snug to avoid gaps.

Step 3: Starting at any point, work Chain 5 in back loops, then repeat (1 double crochet, skip 2 stitches, 1 double crochet) around.

Step 4: Repeat the opening pattern for 10 rounds total, join with mattress stitch, and weave in ends.

Step 5: Make a chain approximately 70cm long. Thread through second-to-last row of holes. Add wooden beads to both ends and secure with tight knots.

Step 6: Work one round of single crochet in the remaining back loops around the opening.

Step 7: Mark center points on front and back, then count 13 stitches on each side and mark. Work single crochet to marked points, attach handles while working with the right side facing you, and continue with single crochet. Repeat for the other side and secure all ends.
Tips: Use mattress stitch for invisible seams. Block squares before joining to ensure even size. Add fabric lining to prevent stretching.
How to Join Granny Squares
While I've used one simple joining method in this pattern, you might find another technique that better suits your style. I'm excited to share my comprehensive guide on 11 Ways to Join Granny Squares with you! I've detailed every method I know and love - each brings its own special touch to your finished piece. Let me help you discover which one works best for you!
How to Weave in Ends Crochet Granny Square
The secret for professional-looking granny squares is all about how you weave in those ends. I'm sharing 3 ways to weave in ends with you! These are techniques I've perfected over years of crocheting and use in all my projects. I'll show you exactly how I secure my ends to make sturdy, polished pieces that last. Trust me, once you master these finishing methods, your granny squares will look absolutely stunning!
Care and Cleaning Instructions
Daily Care Tips
Regular maintenance helps preserve the beauty and structure of crochet bags. Use a lint roller to remove dust and debris from the surface. Empty the bag daily and gently shake it out to prevent dirt from settling into the stitches. Immediately trim any loose threads to maintain a neat appearance and prevent unraveling.
Washing Methods
Hand wash in lukewarm water with a mild wool detergent to protect the fiber integrity. Avoid wringing or twisting the bag as this can distort the stitches. Instead, gently squeeze out excess water and reshape while damp. Allow to dry flat on a clean towel away from direct sunlight to prevent color fading and fiber damage.
Storage Suggestions
Maintain the bag's shape by stuffing it with acid-free tissue paper when not in use. Store in a cool, dry place away from direct sunlight. Use a breathable cotton storage bag rather than plastic to prevent moisture buildup. Avoid hanging the bag by its straps during storage as this can cause stretching and distortion of the structure.

What’s Next?
Excited about this sunflower crochet pattern? Share it with your crafty friends! Whether you're on Facebook, Pinterest, Instagram, or Twitter, spread the joy of crochet and inspire others. Together, let's create a community of makers who support and inspire each other.