Welcome to my crafting corner! Today I'm thrilled to share how to make an elegant granny square crossbody bag that perfectly blends vintage vibes with contemporary flair. This charming accessory features a timeless design that works beautifully for everything from coffee dates to weekend adventures. I especially love how the classic granny square pattern brings a touch of nostalgia while keeping the overall look fresh and modern.
Whether you're a seasoned crocheter or just getting started, don't worry – I've got you covered with clear, step-by-step instructions and plenty of helpful photos along the way. Ready to create your own unique bag? Let's get hooking together!
Pin for Later
Save this vintage-inspired granny square bag tutorial for your next crochet adventure!

Details About Granny Square Crossbody Bag
Let me share all the fun details about this charming Granny Square Crossbody Bag!
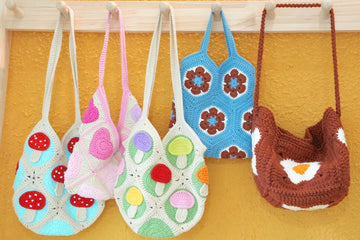
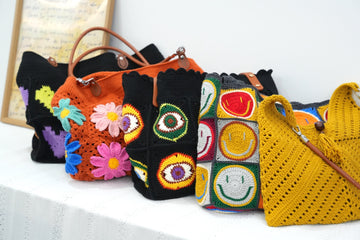
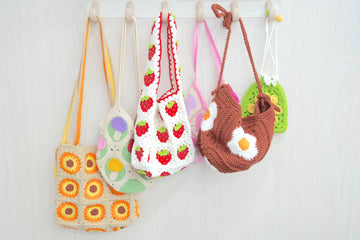
We'll be working with four classic granny squares, each measuring 4.3 inches, which come together to create a perfectly sized crossbody bag. When assembled, the finished bag measures 5.5 inches in height and 12.5 inches in width – just right for carrying your everyday essentials while maintaining that sweet, vintage appeal.
For the color palette, I've designed this pattern to showcase the traditional granny square style with a modern twist. I recommend choosing a main color for your borders and joining, then selecting 2-3 complementary colors for the inner rounds of each square. You might try a neutral main color like black or beige paired with jewel tones for a bohemian look, or stick with a softer palette of pastels for a romantic touch. The magic of granny squares is how they let you play with colors while maintaining that classic, nostalgic charm!
Want to make your bag unique? Feel free to experiment with different color combinations – that's the beauty of granny square projects!
Recommended Yarn and Crochet Hooks
Let me share my favorite yarn and hook recommendations for this charming granny square bag!
For this project, I highly recommend using Loopara 5 ply milk cotton yarn. I absolutely love this yarn for granny squares because it has just the right weight and creates such crisp, clean stitches that really make the square patterns pop. The milk cotton blend is not only super soft to work with, but it also provides excellent stitch definition and helps your bag maintain its shape beautifully.
For the hook size, I'm using a 3.0mm hook, which pairs perfectly with the 5 ply yarn to create firm, sturdy squares. This combination gives us just the right tension – not too tight or too loose – resulting in granny squares that look professional and hold up well for everyday use.
One of the things I love most about milk cotton yarn for granny squares is its smooth texture and gorgeous drape. The slight sheen adds a touch of elegance to your finished bag, while the fiber blend ensures your stitches stay neat and defined. Plus, the yarn is incredibly pleasant to work with, making the crafting process even more enjoyable!
Want to give your bag a personal touch? Feel free to experiment with different color combinations in this yarn – the color range is gorgeous, and the consistent texture ensures your granny squares will look fantastic no matter which shades you choose!
Materials needed for Granny Square Crossbody Bag
- Yarn - Loopara 5ply combed cotton
- Hook - 3.0mm
- Scissors
- Yarn needle
- Stitch marker
- Leather label
- Zipper
- D-shaped buckle
- Leather bag strap

Abbreviations (US Terms)
- Magic ring
- ch – chain
- sl – slip stitch
- sc – single crochet
- dc – double crochet
- hdc – half double crochet
- dc inc – double crochet increase
How to Crochet Granny Square Crossbody Bag – Step by Step
Note: The tutorial uses different yarn colors for the crocheting and assembly processes. You can choose whatever color you like.
If you’re not crazy about our color palette, I put together two color-changing techniques that I use for all of my projects. Let me show you how to make these color transitions smooth and professional so you can bring your unique, creative vision to life.

Round 1: Magic ring. 8 single crochet in ring. Slip stitch to join. Chain 3.

Round 2: Double crochet in same stitch, then make 7 double crochet increases around. Slip stitch to join.

Round 3: Change to new color, chain 3. Repeat (2 double crochet in next stitch, chain 1, skip 1 stitch) 7 more times. Slip stitch to join.

Round 4: Change to new color. Work in skipped stitches from Round 3. Make chain 3 then chain 4 in first stitch. Repeat (Double crochet in next skipped stitch, chain 4) 7 more times. Bring previous round's yarn to front, slip stitch to join.

Round 5: Chain 3, double crochet increase, double crochet. Repeat (Double crochet increase, double crochet) 7 more times. Bring previous round's yarn to front, slip stitch to join.

Round 6: Chain 3, double crochet, chain 4. Repeat (Double crochet increase, chain 4) 7 more times. Bring previous round's yarn to front, slip stitch to join.

Round 7: Chain 3, double crochet increase, 2 double crochet, chain 2. Repeat (Double crochet, double crochet increase, 2 double crochet, chain 2) 7 more times. Bring previous round's yarn to front, slip stitch to join.

Round 8: Chain 1. Repeat (Single crochet, skip 1 stitch, 5 double crochet in next stitch, skip 1 stitch, single crochet, 3 single crochet) 7 more times. Slip stitch to join. Fasten off and weave in ends.

Round 9: Chain 3, double crochet increase, 5 double crochet. Repeat (Double crochet, double crochet increase, 5 double crochet) 7 more times. Slip stitch to join.

Round 10: Repeat [6 single crochet, 2 half double crochet, double crochet, (double crochet increase, chain 2, double crochet increase), double crochet, 2 half double crochet, 3 single crochet] 4 times. Slip stitch to join, chain 3.

Round 11: 2 half double crochet, 8 double crochet, (double crochet increase, chain 2, double crochet increase), 8 double crochet. Repeat [3 half double crochet, 8 double crochet, (double crochet increase, chain 2, double crochet increase), 8 double crochet] 3 more times. Slip stitch to join, chain 1. Fasten off and weave in ends.
Tips: When changing colors between rounds, don't cut the yarn - simply carry it along the back of your work.
Crochet Granny Square Crossbody Bag Assemble
How to Seam the Granny Square

Step 1: Arrange your completed granny squares according to the photos and secure them with stitch markers.

Step 2: Fold the granny squares on both sides and secure with stitch markers to form the bag shape. Now you'll see the basic dumpling-style shape of the bag.

Step 3: Make a slip knot on your hook and use the pull-through method for seaming. Be careful not to pull too tight while seaming to maintain the bag's shape.

Step 4: Continue repeating the pull-through seaming method as demonstrated in the photos. Pay special attention when seaming at the crossing transition points.

Step 5: After completing the first seam path, cut and secure the yarn as shown.

Step 6: Repeat the same seaming process on the other side.

Step 7: To seam the bottom of the bag, start with another slip knot on your hook as illustrated.

Step 8: Insert your hook and use the mattress stitch to complete the bottom edge seaming.

Step 9: Once seaming is complete, cut the yarn and weave in all ends.
How to Crochet the Bag Opening

Step 1: Attach yarn with a slip stitch and begin working single crochet. Pay attention to the transition between the two granny squares.

Step 2: Continue working single crochet stitches. Complete the first round and join to the first stitch.

Step 3: Work single crochet around edge, slip stitch to join in first single crochet.

Step 4: Work single crochet around edge, slip stitch to join in first single crochet.

Step 5: Work single crochet around edge, slip stitch to join in first single crochet.

Step 6: On the final round, add the D-rings.

Step 7: Continue with single crochet stitches. Add another D-ring on the opposite side using the same method. Complete the round with single crochet and join to first stitch.
How to Seam the Lining

Step 1: Fold the lining fabric and place under the bag body.

Step 2: Cut the lining following the bag's shape.

Step 3: Sew the lining edges with multiple stitches for durability.

Step 4: Test the lining size by placing it inside the bag.

Step 5: Iron the lining flat and secure inside the bag with clips.


Step 6: Center the zipper and secure with clips.

Step 7: Begin sewing with a locking stitch method.

Step 8: Secure the zipper with a knot and hide the thread end in nearby stitches.

Step 9: Thread a longer length of yarn to begin sewing the lining.

Step 10: Use invisible stitches to attach the lining. Tuck the fabric at the zipper's front end inside.

Step 11: After completing the zipper seam, keep your thread attached.

Step 12: Start sewing the opposite side of the zipper with new thread.

Step 13: After completing the zipper, continue with the retained thread to finish the lining.

Step 14: Secure with a knot, cut thread, and hide ends.
Tips: Before sewing the lining to your bag, press all edges with an iron and use plenty of clips to hold everything in place. This prevents shifting and ensures your lining fits perfectly.
How to Complete the Final Assembly

Step 1: Attach the straps and leather label to complete your bag.
Tips: Before seaming your squares together, block them first to ensure they're all exactly the same size.
How to Join Granny Squares
While I've used one simple joining method in this pattern, you might find another technique that better suits your style. I'm excited to share my comprehensive guide on 11 Ways to Join Granny Squares with you! I've detailed every method I know and love - each brings its own special touch to your finished piece. Let me help you discover which one works best for you!
How to Weave in Ends Crochet Granny Square
The secret for professional-looking granny squares is all about how you weave in those ends. I'm sharing 3 ways to weave in ends with you! These are techniques I've perfected over years of crocheting and use in all my projects. I'll show you exactly how I secure my ends to make sturdy, polished pieces that last. Trust me, once you master these finishing methods, your granny squares will look absolutely stunning!
Care and Cleaning Instructions
Daily Care Tips
Keep your granny square crossbody bag looking its best by gently brushing off any dust or dirt after each use. Be mindful of sharp objects that might snag the stitches, and avoid overstuffing your bag to maintain its shape. If you notice any loose threads, trim them carefully with scissors to prevent unraveling.
Washing Methods
When your bag needs cleaning, I recommend hand washing with lukewarm water and a gentle soap. Gently squeeze the water through the fabric – avoid wringing or twisting as this can distort the granny squares. After washing, reshape your bag while damp and lay it flat to dry away from direct sunlight. This helps preserve the beautiful stitch definition and color vibrancy.
Storage Suggestions
To maintain your bag's shape when not in use, stuff it lightly with tissue paper before storing. Keep it in a cool, dry place away from direct sunlight to prevent color fading. I like to store mine in a cotton bag to protect it from dust while still allowing the fabric to breathe. For longer storage periods, make sure your bag is completely clean and dry before putting it away.

What’s Next?
If you enjoyed making this granny square crossbody bag, why not share the love? Spread the crochet joy by sharing this pattern on Facebook, Pinterest, Instagram, or Twitter! Your crafty friends will thank you for introducing them to this charming vintage-inspired project. Don't forget to tag me in your finished bag photos – I'd love to see your unique color combinations!