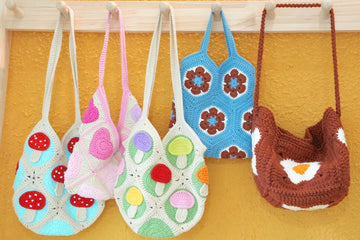
Transform your summer beach trips with this delightful granny square tote that combines classic crochet charm with modern functionality. With its vibrant rainbow color scheme, generous size, and sturdy construction, this bag is perfect for carrying all your seaside essentials while making a stylish statement.
Ready to create your own eye-catching beach companion? I'll guide you through each step of making this versatile tote, from crafting the individual granny squares to assembling and adding those perfect finishing touches. Whether you're a confident beginner or seasoned crocheter, this free pattern includes detailed instructions and helpful photos to ensure your success.
Let's dive in and create something beautiful together!
Pin for Later
Save this colorful granny square beach bag pattern for your next summer project - it's the perfect blend of retro charm and modern functionality!

Details About Granny Square Beach Bag
This cheerful tote is built from individual granny squares, each measuring 7 inches (19 cm). You'll need to make 8 squares in total - 6 for creating the main body and 2 for shaping the base.
When assembled, your finished bag will be the perfect size for all your beach essentials, measuring approximately 18 inches (45 cm) long and 14 inches (35 cm) tall. It's spacious enough for your towel, sunscreen, and summer reading, while still maintaining a comfortable carrying size.
For the color scheme, I've chosen a vibrant summer palette featuring cream, pink, red, sky blue, lime green, and light yellow, with gray trim for a modern finish. But feel free to make it your own! Consider trying a coastal combination of blues, aquas, and sandy neutrals, or go tropical with hot pink, orange, yellow, and lime. A classic nautical theme with navy, white, and red works beautifully too, or embrace a boho vibe with earth tones accented by coral and turquoise. The most important thing is choosing colors that bring you joy - after all, this bag is meant to be your cheerful companion on sunny adventures!
Recommended Yarn and Crochet Hooks
For this project, I absolutely adore Loopara 5-ply milk cotton yarn - it's a dream to work with and perfect for granny squares. The milk cotton blend creates stitches that stay crisp and defined, while still maintaining that soft, comfortable feel we all love. Plus, it comes in this gorgeous range of beachy colors that just make me smile!
Speaking of colors, I'd suggest picking a mix of both vibrant and neutral shades. Think summer sky blues, joyful yellows, playful pinks, and fresh greens, balanced with some cream or gray for that modern touch. What makes granny squares so wonderful is that you can play with different color combinations until you find your perfect match!
For hooks, I recommend starting with a 3.0mm hook - this size creates nice, tight stitches that give your bag structure and prevent small items from slipping through. Here's a pro tip: make a test square first and adjust your hook size if needed. You want stitches tight enough for security but loose enough for good drape.
The beauty of granny squares is their versatility - they're like little canvases for your creativity, and they work up quickly too! Plus, it's such a portable project - you can easily work on individual squares during lunch breaks or while watching your favorite show.
Materials needed for Granny Square Beach Bag
- Yarn– Loopara 5ply combed cotton (Green 05, Pink20, Pink 21, Red 24, Yellow 28, Blue 43, Grey 57 and White 60)
- Hook- 3.0mm
- Scissors
- Yarn needle
- Stitch marker
- Strap

Abbreviations (US Terms)
- ch - chain
- sl - slip stitch
- sc - single crochet
- dc - double crochet
- sc2tog - single crochet 2 together
- Magic ring
- FLO - front loop only
Granny Square Beach Bag Layout

This layout shows the eight colorful granny squares arranged in a cross formation, marking the initial positioning for the beach bag construction. The arrangement helps visualize how the squares will be joined to create the bag's three-dimensional structure.
How to Crochet Granny Square Beach Bag – Step by Step
Note: The tutorial uses different yarn colors for the crocheting and assembly processes. You can choose whatever color you like. If you’re not crazy about our color palette, I put together two color-changing techniques that I use for all of my projects. Let me show you how to make these color transitions smooth and professional so you can bring your unique, creative vision to life.
How to Crochet the Regular Square (Make 8)

Round 1: Chain 4. Slip stitch in the first chain to form a ring.

Round 2: Chain 3 (counts as first double crochet), 2 double crochet, chain 2 in the ring. (3 double crochet, chain 2) 3 times in the ring. Slip stitch to join in top of beginning chain-3.

Round 3: Slip stitch to chain-2 space. Chain 3 (counts as first double crochet), 2 double crochet, chain 2, 3 double crochet in same space. (3 double crochet, chain 2, 3 double crochet) in each chain-2 space around. Slip stitch to join in top of beginning chain-3.

Round 4: Slip stitch to chain-2 space. Chain 3 (counts as first double crochet), 2 double crochet, chain 2, 3 double crochet in same space. 3 double crochet in next space between clusters. [(3 double crochet, chain 2, 3 double crochet) in chain-2 space, 3 double crochet in next space] 3 times. Slip stitch to join in top of beginning chain-3.

Round 5: Slip stitch to chain-2 space. Chain 3 (counts as first double crochet), 2 double crochet, chain 2, 3 double crochet in same space. (3 double crochet in next 2 spaces between clusters). [(3 double crochet, chain 2, 3 double crochet) in chain-2 space, 3 double crochet in next 2 spaces] 3 times. Slip stitch to join in top of beginning chain-3.

Round 6: Slip stitch to chain-2 space. Chain 3 (counts as first double crochet), 2 double crochet, chain 2, 3 double crochet in same space. (3 double crochet in next 3 spaces between clusters). [(3 double crochet, chain 2, 3 double crochet) in chain-2 space, 3 double crochet in next 3 spaces] 3 times. Slip stitch to join in top of beginning chain-3.

Round 7: Slip stitch to chain-2 space. Chain 3 (counts as first double crochet), 2 double crochet, chain 2, 3 double crochet in same space. (3 double crochet in next 4 spaces between clusters). [(3 double crochet, chain 2, 3 double crochet) in chain-2 space, 3 double crochet in next 4 spaces] 3 times. Slip stitch to join in top of beginning chain-3.

Round 8-10: Following the above rules, increase the number of stitches at the four corners in each round.

Round 11: Insert hook in chain space. Chain 1 (does not count as a stitch). In same space, work (single crochet, chain 2, single crochet). Single crochet in next space. [(single crochet, chain 2, single crochet) in next space, single crochet in next space] 4 times. Slip stitch to join in first single crochet.
How to Crochet the Little Ball (Make 1)

Round 1: Create magic ring. Chain 1 (does not count as a stitch). Work 6 single crochet into ring. Slip stitch to first single crochet to join.

Round 2: Chain 1 (does not count as a stitch). Work 2 single crochet in each stitch around (12 single crochet total). Slip stitch to first single crochet to join.

Round 3: Chain 1 (does not count as a stitch). [Work 1 single crochet, then 2 single crochet in next stitch] repeat 6 times (18 single crochet total). Slip stitch to first single crochet to join.

Round 4: Chain 1 (does not count as a stitch). [Work 2 single crochet, then 2 single crochet in next stitch] repeat 6 times (24 single crochet total). Slip stitch to first single crochet to join.

Rounds 5-9: Chain 1 (does not count as a stitch). Work 1 single crochet in each stitch around (24 single crochet total). Slip stitch to first single crochet to join.

Round 10: Chain 1 (does not count as a stitch). [Work 2 single crochet, then single crochet 2 together] repeat 6 times (18 single crochet total). Slip stitch to first single crochet to join.

Round 11: Chain 1 (does not count as a stitch). [Work 1 single crochet, then single crochet 2 together] repeat 6 times. Add fiberfill stuffing before closing (12 single crochet total). Slip stitch to first single crochet to join.

Round 12: Chain 1 (does not count as a stitch). Work single crochet 2 together around (6 stitches total). Leave long tail for sewing closed. Slip stitch to first single crochet to join.
Tips: Keep tension consistent for a uniform spherical shape. Don't overstuff - ball should be firm but not stretched. Use stitch markers to track round beginnings.
Crochet Granny Square Beach Bag Assemble
How to Sew the Front of the Bag
Step 1: Lay out your granny squares according to layout pattern. Secure them with stitch markers in their correct positions.

Step 2: Find the center line and fold the piece in half. Secure both sides with stitch markers to create the bag shape.

Step 3: Begin seaming along the marked edges using single crochet joins. This method creates a more structured and dimensional edge.
Step 4: Start following the first seaming line as shown.

Step 5: Fold the two granny squares together. Locate the first single crochet position at the corner chain space. Pull up a loop and make a locking stitch. Work a single crochet in the same stitch.

Step 6: Match up stitches between both granny squares one by one. Continue working single crochet joins along the seam. Repeat this single crochet joining method throughout.

Step 7: Pay special attention at corner intersections. Work a single crochet into the chain space. Begin connecting the next two granny squares. Start with another single crochet in the chain space.
Step 8: Follow the stitch pattern in sequence. Work single crochet joins consistently.
Step 9: Demonstrate the process one more time. Continue repeating this joining method.

Step 10: Complete all seams. Trim all excess yarn tails neatly. Weave in any remaining ends.
How to Sew the Back of the Bag

Step 1: Insert your hook, then work a single crochet into the braid stitch.

Step 2: Continue working single crochets in sequence, being careful to hide the yarn tails as you go, remember to maintain even tension throughout.

Step 3: Complete all the slip stitches to join, pull through to secure everything neatly, trim the yarn tails for a clean finish.
How to Sew the Base of the Bag

Step 1: Begin the base seaming. Follow the marked path direction. Work your stitches one by one. Keep the tension even as you go. Insert your needle. Start working single crochet stitches. Repeat the previous seaming method. Continue working around the piece.

Step 2: Complete all your stitches. Pull through carefully. Cut the yarn neatly. Secure the end. Follow the marked path for final seaming. Work your way around steadily. Complete all joining stitches.
How to Assemble the Bag

Step 1: Begin the last round by pulling out the yarn and making a slip stitch. Insert your hook in the same stitch. Start working single crochets in sequence.

Step 2: We need to crochet a long chain for securing the ball charm. We made 22 chain stitches, but adjust based on your tension. Just make sure it's long enough to wrap around the ball.
Step 3: Work single crochets in sequence. Repeat until you reach the end.

Step 4: Slip stitch to the first stitch. Fasten off and cut yarn.

Step 5: Position the ball against the bag. Sew it securely in place. Reinforce the stitching several times.
Step 6: Hide the yarn end in nearby stitches. Cut the yarn.

Step 7: Repeat this process for all remaining yarn ends.

Step 8: Attach the bag strap according to the video placement. Your bag is now complete!
Tips: Align all squares with stitch markers first before seaming to ensure proper bag shape. Keep joining tension consistent for professional-looking seams, especially at corners. Double reinforce strap attachments with extra rounds of stitching for durability.
How to Join Granny Squares
While I've used one simple joining method in this pattern, you might find another technique that better suits your style. I'm excited to share my comprehensive guide on 11 Ways to Join Granny Squares with you! I've detailed every method I know and love - each brings its own special touch to your finished piece. Let me help you discover which one works best for you!
How to Weave in Ends Crochet Granny Square
The secret for professional-looking granny squares is all about how you weave in those ends. I'm sharing 3 ways to weave in ends with you! These are techniques I've perfected over years of crocheting and use in all my projects. I'll show you exactly how I secure my ends to make sturdy, polished pieces that last. Trust me, once you master these finishing methods, your granny squares will look absolutely stunning!
Care and Cleaning Instructions
Daily Care Tips
Keep your beach bag looking fresh by giving it a gentle shake after each use to remove sand and debris. For spot cleaning, use a soft brush to remove any surface dirt. Remember to empty your bag completely after each beach trip - those sneaky sand grains love to hide in the corners!
Washing Methods
While your beach bag is washable, hand washing is best to maintain its shape. Use cool water and mild soap, gently squeezing the fabric rather than wringing or twisting. Never put it in the dryer - instead, reshape while damp and lay flat to dry naturally in a shaded area.
Storage Suggestions
Store your beach bag flat or stuffed with tissue paper to maintain its structure when not in use. Keep it in a cool, dry place away from direct sunlight to prevent color fading. If you're storing it long-term, a breathable cotton bag is perfect - just avoid plastic containers that can trap moisture!

What’s Next?
Love this colorful granny square beach bag? Share this free pattern with your crafting friends on Facebook, Pinterest, Instagram, or Twitter! Perfect for summer projects and a great way to use up your cotton yarn stash. Your crochet friends will thank you!