


Peonies have always held a special place in my heart. Their lush, layered petals remind me of lazy summer afternoons in my grandmother's garden.
When I couldn't find the perfect peony-inspired decor for my home, I decided to create my own with crochet! This delicate flower may look complicated, but I promise it's easier than you think.
I've broken down the process into simple, step-by-step instructions with plenty of photos to guide you. Ready to bring a touch of timeless beauty to your space? Let's dive in and crochet a peony together!
Pin for Later
Pin this guide for later – your future self will thank you when you're ready to add a touch of handmade floral charm to your home!

Want to add more blooms to your crochet bouquet? I've got a bunch of free tutorials to help you create all sorts of beautiful flowers! Here is our full crochet flower pattern list (updating weekly).
To ensure you can find the right crochet flower patterns you want quickly, I also did some classification for you, all free!
- Large Crochet Flower Pattern list
- Small Crochet Flower Pattern list
- Crochet Rose Pattern list
- Crochet Flower Applique Pattern list
- Crochet Leaf Pattern List
Peony Meanings & Usages
Peonies are like nature's love letters, if you ask me. These stunning blooms have been cherished for centuries, symbolizing prosperity, good fortune, and even romance. In Chinese culture, they're known as the "king of flowers" - talk about flower royalty!
Peonies have quite the story to tell. In Greek mythology, they're said to be named after Paeon, the physician of the gods. Legend has it that Paeon used the peony root to heal Pluto, and boy, did that make Apollo jealous! To save Paeon from Apollo's wrath, Pluto turned him into the peony flower we know and love today.
In my experience, peonies make the perfect gift for just about anyone who could use a little magic in their life. Whether it's a housewarming, a birthday, or just because, these blooms never fail to bring a smile. I once surprised my mom with a peony plant for her garden, and now, every spring, she calls me excitedly when the first bud appears. It's become our little tradition, a blooming reminder of our bond.
Details of Peony Crochet Pattern

This peony crochet project is perfect for intermediate crocheters looking to challenge themselves with a stunning floral creation. Don't let the intricate petals intimidate you – with patience and attention to detail, you'll be amazed at what you can create!
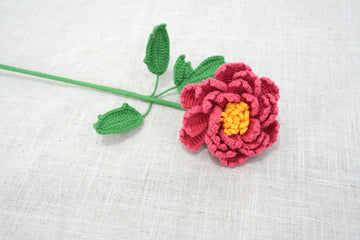
The pattern guides you through crafting a lifelike peony with four layers of petals, totaling 22 petals, plus a center, a flower base, and three leaves. It's a beautiful reflection of nature's design, as real peonies typically have 25-50 petals. Fun fact: in the wild, peonies come in various shades of pink, white, and even yellow!
The best part? You can easily customize this project to suit your style. Try different yarn colors to mimic your favorite peony variety, or mix it up with a fantasy color palette. Add more leaves or create a bouquet by making multiple flowers – the possibilities are endless!
A single finished peony measures about 3-4 inches in diameter, making it perfect for decorative accents. For a showstopping bouquet, consider creating 3-5 peonies of varying sizes and arranging them together for a display that's about 14-15 inches tall. Your handmade peony will bloom forever, bringing a touch of floral magic to any space!
Crochet Peony Flower Bouquet Kits

Ready to bring the beauty of peonies into your home year-round? Our specially curated crochet peony kit has everything you need to create a stunning bouquet of everlasting blooms. Perfect for gift-giving or adding a personal touch to your decor, this kit lets you craft timeless floral charm with your own hands!
Materials Needed
- Yarn – Loopara 4ply combed cotton (Green 12, Yellow 43, Red 62)
- Hook – 2.0mm
- Flower Rod – No.2 (30cm)
- Iron wire – 0.5mm diameter
- Hot Melt Adhesive
- Cotton Stuffing
- Stitch Marker
- Scissors

Abbreviations (US Terms)
- ch – chain
- sc – single crochet
- dc – double crochet
- hdc – half double crochet
- sl – slip stitch
- inc – increase
- FLO – front loop only
- BLO – back loop only
- sc2tog – single crochet 2 together
- pic – picot
- sk – skip
Crochet Peony Pattern
How to Crochet a Flower Center (Make 1)
Create a magic ring.

Round 1: Make 10 single crochet into the ring, slip stitch to join.

Round 2: Working in front loops only, (chain 7, slip stitch, skip 1 stitch, slip stitch) 5 times, slip stitch, chain 1.

Round 3: Working in back loops only, make 10 single crochet increases (20 single crochet total), slip stitch to join, chain 1.

Round 4: Working in front loops only, (chain 8, skip 1 stitch, slip stitch) 10 times, slip stitch to join.
Tips: Ensure your magic ring is secure for a sturdy flower center. The alternating front loop only (FLO) and back loop only (BLO) rounds create texture and depth in your peony center. Use stitch markers to keep track of your rounds, especially in Round 2 and 4 where you're creating loops.
How to Crochet the First Layer Petals (Make 5)

Round 1: Working in back loops only, make 20 single crochet, slip stitch to join.

Round 2: Working in front loops only, chain 7, make 4 afghan double crochet, 2 afghan single crochet in 2nd chain from hook (last afghan single crochet in 2nd stitch front loop only).

Round 3: Chain 2, slip stitch in 2nd chain from hook.

Round 4: Chain 2, make 3 afghan double crochet, 3 afghan single crochet in 4th chain from hook (last afghan single crochet in next front loop only).

Round 5: Chain 2, slip stitch in 2nd chain from hook, chain 2, make 3 double crochet, 1 half double crochet, 1 single crochet in 4th chain from hook, slip stitch in next front loop only.
Repeat Rounds 2-5 four more times to complete all 5 petals.
Tips: The back loop only (BLO) in Round 1 creates a ridge for attaching petals. The afghan stitches in Rounds 2 and 4 give the petals a unique texture. Use stitch markers to keep track of each petal's starting point. Adjust tension as needed to shape your petals.
How to Crochet the Second Layer Petals (Make 5)

Round 1: Working in back loops only, (4 single crochet, 1 single crochet increase) 4 times, slip stitch to join.

Round 2: Make 3 slip stitches.

Round 3: Working in front loops only, chain 8, make 5 afghan double crochet, 2 afghan single crochet in 2nd chain from hook (last afghan single crochet in next front loop only).

Round 4: Chain 2, slip stitch in 2nd chain from hook.

Round 5: Chain 2, make 4 afghan double crochet, 3 afghan single crochet in 4th chain from hook (last afghan single crochet in next front loop only).

Round 6: Chain 2, slip stitch in 2nd chain from hook, chain 2, make 4 double crochet, 1 half double crochet, 1 single crochet in 4th chain from hook, slip stitch.
Repeat Rounds 2-6 four more times to complete all 5 petals.
Tips: The back loop only (BLO) in Round 1 creates a ridge for attaching petals and increases the stitch count for larger petals. The slip stitches in Round 2 help position your hook for the petal. Afghan stitches in Rounds 3 and 5 give the petals texture. Use stitch markers to keep track of each petal's starting point.
How to Crochet the Third Layer Petals (Make 6)

Round 1: Working in back loops only, (4 single crochet, 1 single crochet increase) 5 times, slip stitch to join.

Round 2: Make 4 slip stitches.

Round 3: Working in front loops only, chain 10, make 6 afghan double crochet, 3 afghan single crochet in 2nd chain from hook (last afghan single crochet in next front loop only).

Round 4: Chain 2, make 2 slip stitches in 2nd chain from hook.

Round 5: Chain 2, make 5 afghan double crochet, 4 afghan single crochet in 4th chain from hook (last afghan single crochet in next front loop only).

Round 6: Chain 2, slip stitch in 2nd chain from hook.

Round 7: Chain 2, make 5 afghan double crochet, 4 afghan single crochet in 4th chain from hook (last afghan single crochet in next front loop only).

Round 8: Chain 2, slip stitch in 2nd chain from hook, chain 2, make 5 double crochet, 1 half double crochet, 2 single crochet in 4th chain from hook, slip stitch in next front loop only.
Repeat Rounds 3-8 five more times to complete all 6 petals.
Tips: The back loop only (BLO) in Round 1 creates a ridge for attaching petals and increases the stitch count for even larger petals. The slip stitches in Round 2 help position your hook for the petal. Afghan stitches in Rounds 3, 5, and 7 give the petals extra texture and fullness. Use stitch markers to keep track of each petal's starting point in this more complex layer.
How to Crochet the Fourth Layer Petals (Make 6)

Round 1: Working in back loops only, make 30 single crochet, slip stitch to join.

Round 2: Working in front loops only, chain 11, make 7 afghan double crochet, 3 afghan single crochet in 2nd chain from hook (last afghan single crochet in next front loop only).

Round 3: Chain 2, slip stitch in 2nd chain from hook, chain 2, make 6 afghan double crochet, 4 afghan single crochet in 2nd chain from hook (last afghan single crochet in next front loop only).

Round 4: Chain 2, slip stitch in 2nd chain from hook, chain 2, make 6 afghan double crochet, 4 afghan single crochet in 2nd chain from hook (last afghan single crochet in next front loop only).

Round 5: Chain 2, slip stitch in 2nd chain from hook, chain 2, make 6 double crochet, 1 half double crochet, 2 single crochet in 2nd chain from hook, slip stitch twice, chain 1.
Repeat Rounds 2-5 five more times to complete all 6 petals.
Tips: The back loop only (BLO) in Round 1 creates a ridge for attaching the largest petals. This layer uses longer chains and more afghan stitches for fuller, more dramatic petals. The repetition in Rounds 3 and 4 adds extra volume. Use stitch markers to keep track of each petal's starting point. Adjust your tension to shape these outermost petals for a natural, blooming look.
How to Crochet a Flower Base (Make 1)

Round 1: Working in back loops only, make 30 single crochet, slip stitch to join.

Round 2: Chain 3, make 2 afghan single crochet in 2nd chain from hook (last afghan single crochet in next stitch's front loop only).

Round 3: Chain 3, make 4 afghan single crochet in 2nd chain from hook (last afghan single crochet in next stitch's front loop only).

Round 4: Chain 5, make 4 slip stitches in 2nd chain from hook, 4 afghan single crochet (last afghan single crochet in next stitch's front loop only).

Round 5: Chain 1, make 2 slip stitches in 2nd chain from hook, 2 afghan single crochet (last afghan single crochet in next stitch's front loop only).

Round 6: Chain 1, make 2 slip stitches in 2nd chain from hook (last slip stitch in next stitch's front loop only).
Repeat Rounds 2-6 five more times.

Round 7: Working in back loops only, make 30 single crochet, slip stitch to join, chain 1.

Round 8: Make 15 single crochet 2 together (stuff with fiberfill, insert stem), slip stitch to join, chain 1.

Round 9: Make 7 single crochet 2 together, 1 single crochet, slip stitch to join, chain 1.

Round 10: Make 4 single crochet 2 together, slip stitch to join.
Tips: The back loop only (BLO) in Round 1 creates a ridge for attaching the base to the petals. The repeated pattern in Rounds 2-6 creates a textured base. Stuff the base firmly in Round 8 for a stable flower. The decreases in Rounds 8-10 shape the base to a point for attaching the stem. Use stitch markers to keep track of your rounds, especially during the repeated section.
How to Crochet a Small Leaf (Make 2)

Round 1: Chain 15 (add wire), single crochet in 2nd chain from hook, 1 half double crochet, 8 double crochet, 1 half double crochet, 2 single crochet, 3 single crochet in next stitch, 2 single crochet, 1 half double crochet, 8 double crochet, 1 half double crochet, 1 single crochet, slip stitch, chain 1.

Round 2: 1 single crochet, 1 half double crochet, 1 double crochet increase, (1 double crochet, picot, 1 half double crochet), 6 half double crochet, (1 half double crochet, picot, 1 single crochet), 2 single crochet, (1 single crochet, chain 3 picot, 1 single crochet), 8 single crochet, 5 half double crochet, (1 half double crochet, 1 single crochet), slip stitch to join.
Tips: Adding wire in Round 1 helps shape and position the leaf. The increase of stitches in the middle of Round 1 creates the leaf's point. Picots in Round 2 add texture to the leaf edge. Adjust tension as needed to create a natural leaf shape. Make two leaves for a balanced look on your peony.
How to Crochet a Large Leaf (Make 1)
Side 1:

Round 1: Chain 18 (add wire), chain 3, slip stitch in 3rd chain from hook, 2 single crochet, 8 half double crochet, 3 single crochet, slip stitch, chain 1.

Round 2: Turn, make 9 single crochet in 2nd chain from hook, slip stitch, chain 1.

Round 3: Turn, slip stitch in 2nd chain from hook, 1 single crochet, 6 half double crochet, 1 single crochet, 1 single crochet in side, 1 single crochet in last stitch of previous row, 3 single crochet.

Round 4: Turn, skip 1, 3 single crochet, chain 3, slip stitch in 2nd chain from hook, 1 single crochet.

Round 5: Turn, 2 half double crochet, 1 single crochet, 1 single crochet in side, 1 single crochet in last stitch of previous row, 2 single crochet.

Round 6: Turn, skip 1, 7 single crochet, chain 3, slip stitch in 2nd chain from hook, 1 single crochet.

Round 7: Turn, 2 half double crochet, 1 half double crochet increase, 3 half double crochet, 1 single crochet, 1 single crochet in side, slip stitch in same stitch as previous single crochet (around wire).
Side 2:
Round 1: 18 single crochet, slip stitch.
Round 2: Turn, skip 1, 2 single crochet, 8 half double crochet, 3 single crochet.
Repeat Rounds 3-7 from Side 1, slip stitch to join.
Tips: Adding wire in Round 1 helps shape and position the larger leaf. The turning and working in sides creates the leaf's shape. Adjust tension as needed for a natural leaf shape. This larger leaf complements the two smaller leaves for a balanced peony stem.
Crochet Peony Assemble

Step 1. Prepare and attach leaves:
1. Wrap wire around the large and small leaves to desired positions.
2. Assemble the large and small leaves together.
3. Wrap wire around the flower stem to a suitable length.
4. Attach the prepared leaves to the stem, wrapping them securely.
5. Continue wrapping to the bottom of the stem.
6. Secure the leaves with a small amount of glue at the stem's base.


Step 2. Assemble and attach flower:
1. Start with the flower center and innermost petal layer.
2. Gradually add each petal layer, working from smallest to largest.
3. Secure each layer with a small amount of glue as you go.
4. Carefully insert the stem wire through the center of the assembled flower.
5. Slide the flower base up the stem to meet the bottom of the petals.
6. Secure the flower base to the stem with a small amount of glue.
7. Gently shape and position the petals and leaves for a natural look.
Tips: Work slowly and carefully to avoid damaging the crocheted pieces. Use a low-temperature glue gun to prevent melting the yarn. Adjust petal and leaf positions as you go for the most realistic peony shape.
More Free Crochet Patterns
If you love to crochet, I think you’ll enjoy these lovely flowers.
What's Next
Excited about your new crochet peony skills? Share the love! Post your creation on Facebook, Pinterest, Instagram, or Twitter and inspire your crafty friends. Use #CrochetPeony to connect with fellow makers. Your handmade bloom might just spark someone else's creativity. Plus, who doesn't love a little floral eye candy on their feed? Spread the joy of crochet, one petal at a time!


